Traverse Standard v11.0
Material Requisitions
Use the Material Requisitions function to enter material requisition transactions or to enter return transactions for items that were not used and that were returned to the warehouse.
To create a new material requisition:
- Click the New button on the toolbar to open a blank material requisition or the Update button to make changes to an existing requisition.
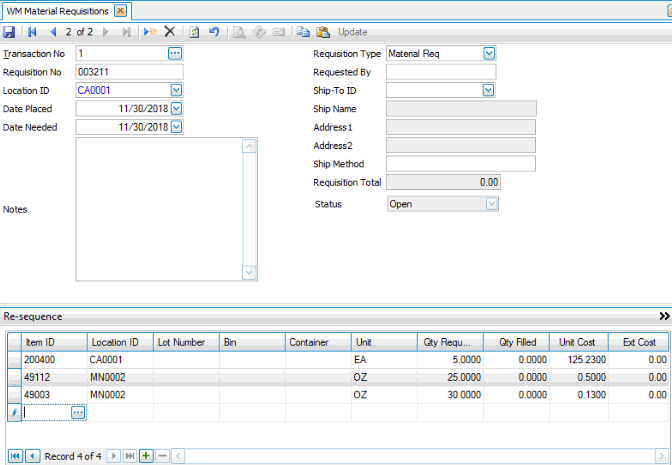
- Enter a Requisition No or select a requisition to edit.
- Select a Location ID to associate with the requisition.
- Accept or select the date the requisition is placed in the Date Placed field.
- Select the date the material is needed in the Date Needed field.
- Enter any Notes about the requisition.
- Select the Requisition Type. You cannot edit the Requisition Type after you save the Material Requisition.
- Enter the person, office, or project to associate with the requisition in the Requested By field.
- Select a Ship-To ID for the requisition. The shipping information automatically populates into the Ship Name, Address 1, and Address 2 fields. Hint: Double-click the field to open the Inventory Ship-To Addresses maintenance screen.
- Enter the Shipping Method for the requisition.
- The Requisition Total is a view-only field that displays the total for the requisition.
- The read-only Status field shows the current status for the requisition.
Line Items
- Use the Re-sequence button to reset the line sequence numbers if you've dragged the item lines into a different order.
- Use the Toggle button (
 ) to switch to field view.
 - Remember, you can use the Column Chooser to add columns to the grid.
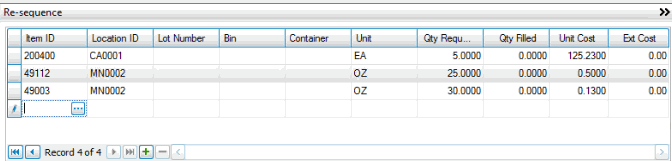
- Use the Append button to add a new record.
- Select an Item ID to requisition.
- Select the Location ID from which you want to requisition the item.
- If applicable, select a Lot Number to associate with the Item ID.
- Select, if applicable, the Bin and/or Container where the item is located.
- Select the Unit of measure for the item.
- Enter the quantity of the selected item to include in the requisition in the Qty Requested field.
- The view-only Qty Filled field displays the quantity of items filled once the requested items have been picked or received and confirmed.
Note: When you confirm picked items in the Record Picked Orders function (for requisitions), or confirm item receipts in the Receive Goodsfunction (for returns), Warehouse Management automatically updates the Qty Filled for requisitions based on the quantity you entered in those functions. - If necessary, enter the Unit Cost for the item.
- The view-only Ext Cost field displays the extended cost (Unit Cost multiplied by the Quantity).
- Repeat steps 1 through 9 for each item you want to add to the requisition.
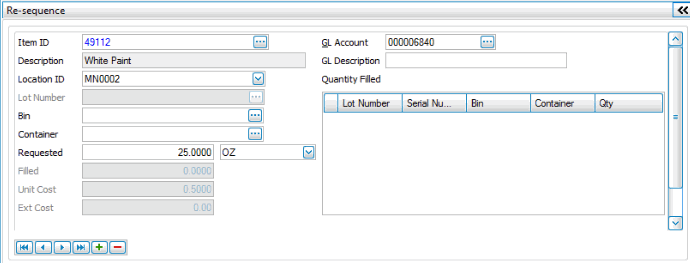
- Select an Item ID to requisition. The item Description displays.
- Select the Location ID from which you want to requisition the item.
- If applicable, select a Lot Number to associate with the Item ID.
- Select, if applicable, the Bin and/or Container where the item is located.
- Enter the quantity of the selected item to include in the requisition in the Requested field. Select the Unit of measure for the item.
- The view-only Filled field displays the quantity of items filled once the requested items have been picked or received and confirmed.
Note: When you confirm picked items in the Record Picked Orders function (for requisitions), or confirm item receipts in the Receive Goodsfunction (for returns), Warehouse Management automatically updates the Qty Filled for requisitions based on the quantity you entered in those functions. - If necessary, enter the Unit Cost for the item.
- The view-only Ext Cost field displays the extended cost (Unit Cost multiplied by the Quantity).
- Accept or edit the GL Account to associate with the item being requisitioned, if necessary.
- Accept or edit the selected GL account's GL Description, as necessary.
- Select, if applicable, a Lot Number or Serial Number for the Item ID.
- Repeat steps 1 through 11 for each item you want to add to the requisition.
Save the requisition.
Once you have entered the requisition:
- Use the Release Orders function to generate a list of the material requisitions (and other orders) for which you need to pull items from Inventory for shipment.
- Print the picking list to guide you as you pick items for orders.
- Use the Record Picked Ordersfunction to record item IDs you pull from inventory and apply them to material requisitions. When you confirm your entries, Warehouse Management automatically updates the filled quantity for the material requisitions you selected.
- Use the Post Material Requisitions function to update inventory quantities and move filled material requisition records to history.
To process a Material Requisition Return
Once you have entered the requisition:
- Use the Receive Goodsfunction to record the item IDs you receive and apply then to material requisition return transactions. When you confirm your entries, Warehouse Management automatically updates the filled quantity for the material requisitions you selected.
- Use the Post Material Requisitions function to update inventory quantities and move filled material requisition records to history.
To edit a material requisition:
- Select a Transaction No to edit.
- Click the Update button after selecting a transaction number to edit the selected transaction.
Note: You cannot edit the transaction number. - Edit fields as necessary.
- Save the requisition.