Traverse Standard v11.0
Receipts/Invoices
Use this button to view one of the following:
- the Receipts and Invoices dialog box if the items are not serialized, lotted, or serialized and lotted.
- the Receipts and Invoices Lotted Items dialog box if items are lotted.
- the Receipts and Invoices Serial Items dialog box if the items are serialized or serialized and lotted.
Note: This button only appears for new order, goods received, or invoice received transactions. If no information appears when the dialog box opens, close the dialog box, click Update on the transactions screen, select the line item, then click the Receipts/Invoices button again.
Receipts
- Select the Purchase Order transaction which includes the item(s) you want to receive. See PO Transactions for more information.
- Select a non-serialized item from the PO line items grid.
- Click the Receipts/Invoices button on the menu bar to open the Receipts window.
- Click the New button to start a new receipt. If the New button is not active, close the Receipts window, click the Update button on the toolbar of the PO Transactions screen, then open the Receipt screen again.
- Enter a Receipt No. if you are starting a new receipt. Select a Receipt No. if you are editing a receipt.
- Accept or edit the Date of the receipt.
- Accept or edit the Fiscal Period/Year of the receipt.
- If applicable, select an exchange rate for the receipt from the Exch Rate drop-down list.
- Select a shipment number from the Shipment No field. The shipments in the status of New, In Process and Received are available for the selection. Items and Quantities can be loaded from the Shipment function. If the PO Line is not link to a Shipment, You can edit the shipment to add the line, calculate the landed cost and enter the receipt.
- In the Entry No. column, select the line item you want to receive from the drop-down list. Only line items eligible to be received will appear in the list.
- If the item is lotted, enter a Lot No. for the received item(s).
- Accept or edit the Qty received.
- When finished, click the Save button, then click on the close button to close the Receipts screen and return to the transactions screen.
- Select the Purchase Order transaction which includes the item(s) you want to receive. See PO Transactions for more information.
- Select a serialized item from the PO line items grid.
- Click the Receipts/Invoices button on the menu bar to open the Receipts window.
- Click the New button to start a new receipt. If the New button is not active, close the Receipts window, click the Update button on the toolbar of the PO Transactions screen, then open the Receipt screen again.
- Enter a Receipt No. if you are starting a new receipt. Select a Receipt No. if you are editing a receipt.
- Accept or edit the Date of the receipt.
- Accept or edit the Fiscal Period/Year of the receipt.
- In the Entry No. column, select the line item you want to receive from the drop-down list. Only line items eligible to be received will appear in the list.
Click the Save button.
- To enter a serial number for the received item, click on the Lot No. column header. A child grid will appear to allow you to enter a serial number for each received item.
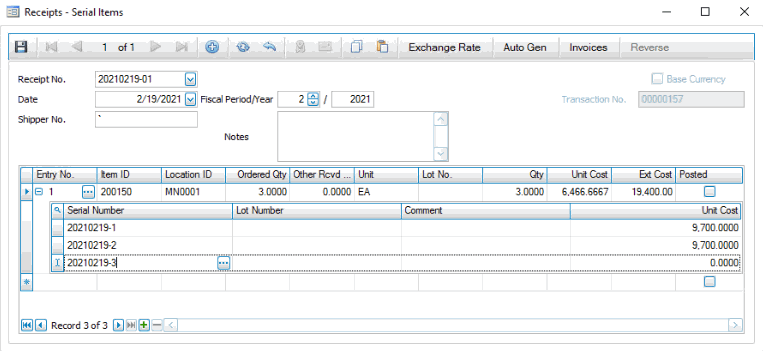
Alternately, you can use the Auto Gen button to automatically create sequential serial numbers. Enter a first serial number in the Serial Number column, then click the Auto Gen button. The Generate Serial Numbers screen will appear.
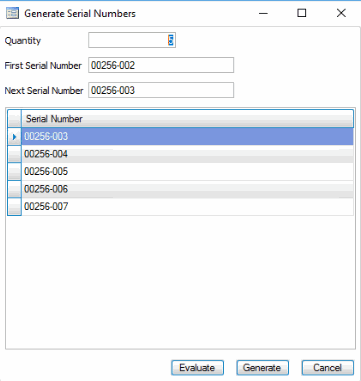
Accept or enter the next serial number sequentially in the Next Serial Number field, then use the Evaluate button. The system will list the serial numbers it will generate for the received items. If the serial numbers are correct, click the Generate button. The ordered quantity of the item will be listed with the serial numbers assigned at receipt.
You can generate sequential numbers or numbers that use an increment value you specify, such as even numbers or using letters. If you want to generate sequential numbers using any increment, enter the first serial number, then enter the next serial number when incremented in the Next Serial Number field.
- When finished, click the Save button, then click on the close button to close the Receipts screen and return to the transactions screen.
Reverse button
Once a receipt is posted, you cannot edit it. If you need to make corrections on a PO transaction receipt that has been posted, you reverse the original receipt record, and then you can edit the receipt. The edited receipt will be posted in the current period. Use the Reverse button to reinstate the original receipt and reverse the previous activity into the selected fiscal period/year.
NOTES:
- You cannot create a reversing entry in a closed fiscal period.
- You cannot reverse receipts for which any line items have been invoiced.
To reverse a receipt:
- Select the posted receipt you want to reverse.
- Click Reverse to open the PO Receipt Reversal window.
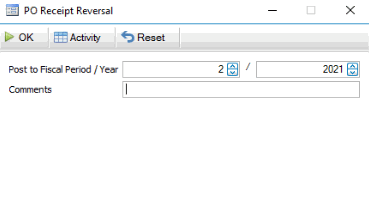
- Accept or enter the fiscal period/year to which the system will post the reversing entry in the Post to Fiscal Period/Year fields. Note the reversing entry uses the fiscal period from these fields and not the fiscal period of the original receipt.
- Enter any Comments.
- Use the command buttons
Click To OK Run the reversal process. Activity Display the Activity Log to view posting activity. Reset Set all fields to their default values. - A notification will appear when the reversal process is complete.
- Once the reversal process is complete, you can edit the receipt and proceed as usual.
The PO receipt reversal will appear in the system audit activity logs.
Invoices
- Select the Purchase Order transaction which includes the received item(s) for which you want to enter an invoice.
- Select a non-serialized item from the PO line items grid.
- Click the Receipts/Invoices button on the menu bar to open the Receipts window.
- Click on the Invoices button on the tool bar to switch to the Invoices window.
- Click the New button to enter a new invoice. If the New button is not active, close the Invoices window, click the Update button on the toolbar of the PO Transactions screen, then open the Invoices screen again.
- Enter an Invoice No. if you are entering a new invoice. Select an Invoice No. if you are editing an Invoice.
- Accept or edit the Date of the invoice.
- Accept or edit the Fiscal Period/Year of the invoice.
- In the Entry No. column, select a line item that appears on the invoice you are entering.
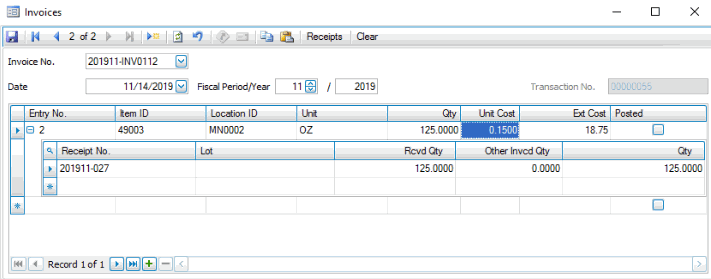
The Item ID, Location ID, Ordered Qty, Other Rcvd Qty, Unit, Qty, Unit Cost, and Ext Cost values will appear, as well as a child window with the receipt information for the item.
- Accept or edit the Qty of the item from the invoice.
- Accept or edit the Unit Cost of the item from the invoice.
- When you are finished entering the invoice, click the Save button, then click on the close button to close the Invoices screen and return to the transactions screen.
Clear button
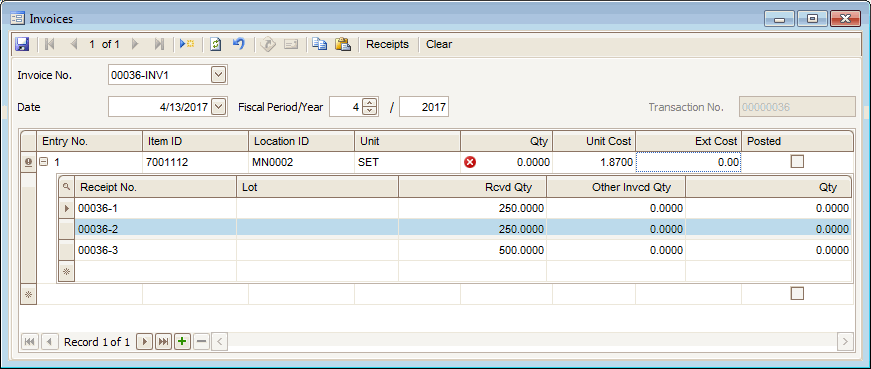
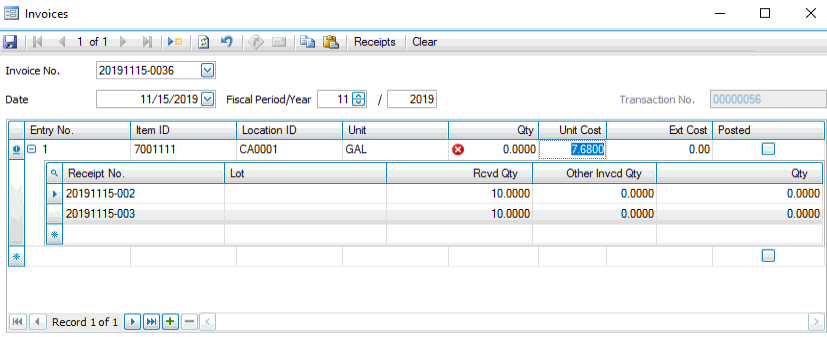
When multiple receipts have been entered for an order and a new invoice is entered, the receipt totals are automatically used for the new invoice record. The Clear button on the invoice screen will reset the automated receipt quantities to 0 and allow users to specify the quantity.
You must have multiple receipts entered to use the Clear button. When you enter the invoice, the receipt quantities are automatically transferred to the new invoice record.
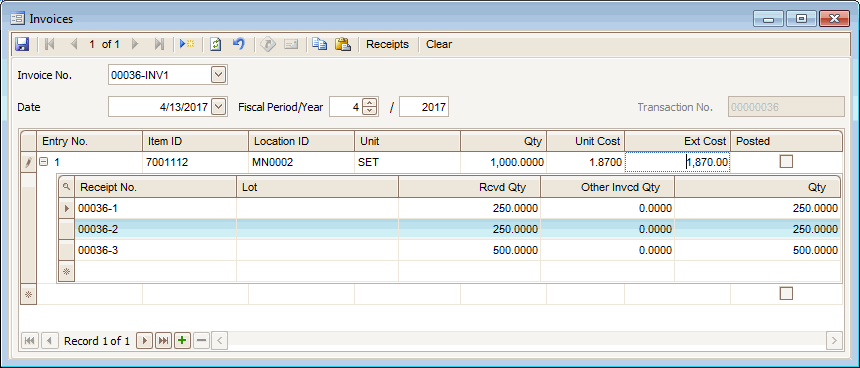
The Clear button is active at this time. If used, the values in the invoice’s Qty and Ext Cost fields are set to 0 and can be entered as necessary.
- Select the Purchase Order transaction which includes the received item(s) for which you want to enter an invoice.
- Select a serialized item from the PO line items grid.
- Click the Receipts/Invoices button on the menu bar to open the Receipts window.
- Click on the Invoices button on the tool bar to switch to the Invoices window.
- Click the New button to enter a new invoice. If the New button is not active, close the Invoices window, click the Update button on the toolbar of the PO Transactions screen, then open the Invoices screen again.
- Enter an Invoice No. if you are entering a new invoice. Select an Invoice No. if you are editing an Invoice.
- Accept or edit the Date of the invoice.
- Accept or edit the Fiscal Period/Year of the invoice.
- In the Entry No. column, select a line item that appears on the invoice you are entering.
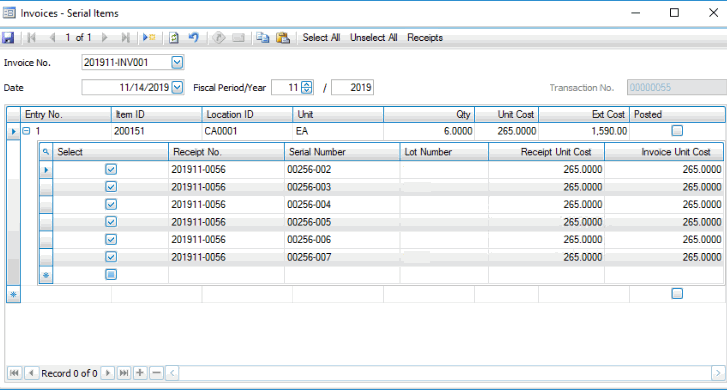
The Item ID, Location ID, Ordered Qty, Other Rcvd Qty, Unit, Qty, Unit Cost, and Ext Cost values will appear, as well as a child window with the receipt information for the item.
- Click on the Qty column header to open the child grid listing the serial numbers received. Mark the Select check box for each serial number listed on the invoice.
- Accept or edit the Unit Cost of the item from the invoice.
- When finished, click the Save button, then click on the close button to close the Receipts screen and return to the transactions screen.
Clear button
When multiple receipts have been entered for an order and a new invoice is entered, the receipt totals are automatically used for the new invoice record. The Clear button on the invoice screen will reset the automated receipt quantities to 0 and allow users to specify the quantity.
You must have multiple receipts entered to use the Clear button. When you enter the invoice, the receipt quantities are automatically transferred to the new invoice record.
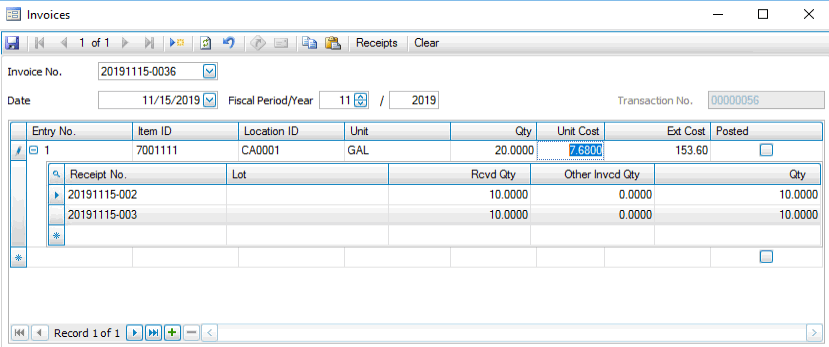
The Clear button is active at this time. If used, the values in the invoice’s Qty and Ext Cost fields are set to 0 and can be entered as necessary.
Auth/Debit Memo
Use this button to view one of the following:
- the Return Auth and Debit Memos dialog box if the items are not serialized, lotted, or serialized and lotted.
- the Return Auth and Debit Memos Lotted Items dialog box if the items are lotted.
- the Return Auth and Debit Memos Serial Items dialog box if the items are serialized or serialized and lotted.
Note: This button only appears for new returns, return authorizations, or debit memo transactions. If no information appears when the dialog box opens, close the dialog box, click Update on the transactions screen select the line item, then click the Auth/Debit Memo button again.
- Select the Purchase Order transaction which includes the item(s) you want to return. See PO Transactions for more information.
- Click the Auth/Debit Memo button on the menu bar to open the Return Auth window.
- Click the New button to start a new return authorization. If the New button is not active, close the Return Auth window, click the Update button on the toolbar of the PO Transactions screen, then open the Return Auth screen again.
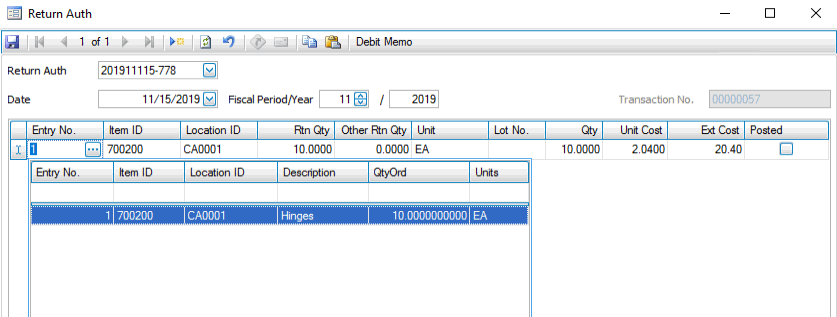
- Enter a Return Auth number if you are starting a new return authorization. Select a Return Auth number if you are editing a return authorization.
- Accept or edit the Date of the return authorization.
- Accept or edit the Fiscal Period/Year of the return authorization.
- If applicable, select an exchange rate for the return from the Exch Rate drop-down list.
- In the Entry No. column, select the item you want to return from the drop-down list. Only items that have been received will appear in the list.
The Item ID, Location ID, Ordered Qty, Other Rcvd Qty, Unit, Qty, Unit Cost, and Ext Cost values will appear.
- If the item is lotted, enter a Lot No. for the returned item(s).
- Accept or edit the Qty to return.
- When you are finished, click the Save button.
- Select the Purchase Order transaction which includes the item(s) for which you want to enter a debit memo. See PO Transactions for more information.
- Click the Auth/Debit Memo button on the menu bar to open the Return Auth window.
- Click the New button to enter a new debit memo. If the New button is not active, close the Debit Memo window, click the Update button on the toolbar of the PO Transactions screen, then open the Debit Memo screen again.
- Enter a Debit Memo number if you are entering a new debit memo. Select a Debit Memo number if you are editing a debit memo.
- Accept or edit the Date of the debit memo.
- Accept or edit the Fiscal Period/Year of the debit memo.
- In the Entry No. column, select the item for which you want to enter a debit memo from the drop-down list.
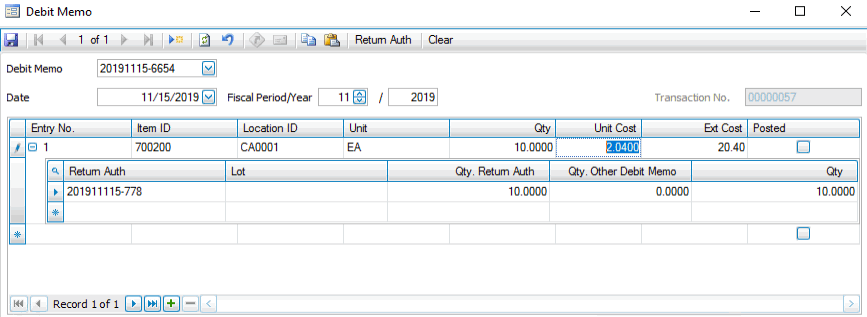
The Item ID, Location ID, Ordered Qty, Other Rcvd Qty, Unit, Qty, Unit Cost, and Ext Cost values will appear, as well as a child window with the receipt information for the item.
- If the item is lotted, enter a Lot No..
- Accept or edit the Qty.
- When you are finished, click the Save button.
