Traverse Standard v11.0
Writing Formulas
The Payroll system has the ability to use formulas to calculate deductions, employer costs, local withholdings, and employer taxes based on earnings and tables. You can use Variables for numbers such as year-to-date amounts, gross earnings, and so on, which you can manipulate using Methods, Operations, and Functions, much like a spreadsheet program. You can also look up tax rates and other variable factors in formula tables.
The Payroll system uses formulas to calculate deductions and withholdings based on earnings and tables. These formulas involve variables, constants, operations, and functions.
- Commands are functions that tell the formula what to do to retrieve a value.
- Variables are an equivalent that stand for something which can change value as other actions occur. There are numeric, as well as text, variables.
- Constants are positive or negative numbers.
- Factors are a constant defined in a formula or in an employee or employer override factor. You can set up to six factors in each formula. Employee and employer formulas have up to six override factors.
- Functions you can use three types of functions when constructing formulas: Table Lookups, Conditionals, and MIN/MAX functions.
- Operations proceed according to standard mathematical rules. Multiplication and division are first performed. Addition and subtraction are performed afterwards. Functions within parentheses are performed before operations outside of parenthesis.
You can use positive or negative numbers (constants) in formulas. You can also use these variable which store payroll information values set by the Payroll system as it calculates the employee’s paycheck:
Traverse uses Iron Python scripting for the scripting language to write the formulas. There are many books available as references to use when writing scripts. A summary of valid variables, operations, and functions follow. If you are new to formulas or you need to review them, several examples of formulas are available in this section.
Formula Tips
- When setting up your formulas, you don’t need to type all the commands and variables into the formula. With the formula box open you can double click on the command and variable in the right column to bring the value double clicked on into the formula, and then add quotation marks and other text to the formula manually. The value double clicked on will be brought into the formula at the point of the cursor.
- If your formula might result in a negative amount calculated use a line at the end of the formula similar to this:
if L3 < 0:
L4 = 0
else:
L4 = L3
This formula line says if line 3 is less than zero then return 0 or else return the value from line 3.
- If you are going to be using variable amounts that could change for each employee, use the factor fields and use the (“FCx”) function (x being the value 1 to 6 corresponding to the factor fields).
- When using the conditional if: else: make sure to put a colon after the if statement and after the else command. When defining the then, the line after the if, and when defining the else, the line after the else, be consistent with the number of spaces used to indent the conditional values. In this sample above, 3 spaces are used for each of the if, then, else conditional statements.
- When using the #tax methods commands, the variable and factors must be enclosed in quotation marks within the parentheses (“ADJEARN”).
- When bringing in line number values into another line the line numbers are not enclosed in parentheses or quotation marks. For example: L9 = L6 - L8
- Line numbers can be defined in many different ways within the formulas. The line number is defined by putting an equal sign after the value you want to use for the line number. For example: L1 = would be defining line 1. y1 = would also be defining line 1 but using the y as a reference. When only one line is used you can use a character reference such as res = to define the line number as the result.
- The last line in each formula must contain the f.SetNumericVariable command to return the value calculated. For example: f.SetNumericVariable(“CALCVALUE”, L4) is saying set the numeric variable to the calculated value from line 4, which is the last line defined in the formula.
Formula Examples
The following examples demonstrate how to use different functions in the Payroll system to set up deductions calculated by formulas. There is more than one way to set up these deductions to calculate correctly. The setups used in the examples are chosen to give you an overview of how the different functions in the Payroll system can work together to calculate deductions.
When the system calculates deductions, deductions set up to be calculated on gross pay in the Deductions/Employer Costs function on the Code Maintenance menu. Deductions are calculated first in the order of the sequence number for the pay period in the Deductions tab in the Employee Information function.
After the gross pay deductions are calculated, the withholdings are calculated.
Deductions set up to be calculated on net pay are deducted last and are deducted in the reverse order of the sequence number on the deductions tab. For Example: If the pay check was not large enough to have all the withholdings and deductions taken out and have an amount to print on the check, the deduction calculation will look to the deduction setup for the employee and remove the deduction with the largest sequence number. If the check now has enough to cover the withholdings and deductions it will print a check for 0 dollars and not include the stock plan as a deduction.
If a garnished deduction must be calculated after certain other deductions are taken, then the deductions that can be taken prior to the garnishment deduction should be set up as gross pay deductions. Set up the garnishment deduction as a net pay deduction.
If there are deductions that can be calculated after the garnishment is deducted, they should be set up as calculated on net pay and should have a sequence number larger than the garnishment deduction in the Scheduled Deduction section of the Employee Information screen on the Deductions tab.
This garnishment deduction should be calculated so that the maximum net pay the employee ever receives is $300. All other scheduled Deductions for the Employee can be deducted prior to calculating this garnishment. The difference between the gross pay less withholdings and deductions, and the end result of a $300 check is the amount of the garnishment deduction. If the gross pay less withholdings and deductions is less than $300, then the garnishment deduction is 0.
Example: For an employee: if gross pay = $1,000, medical insurance deduction = $20, state and federal withholdings = $80, then net pay = $900. This garnishment deduction allows for the employee’s new pay to be a maximum of $300, so the amount of the garnishment deduction would be $600 for this pay period.
To set up the deduction:
Enter the formula in the Formulas function (PA Setup and Maintenance menu):
- Use the New button on the toolbar to create a new record.
- Enter a Formula ID and a Description for the deduction.
- Use the Append button (
 ) to add a new formula for the current payroll year.
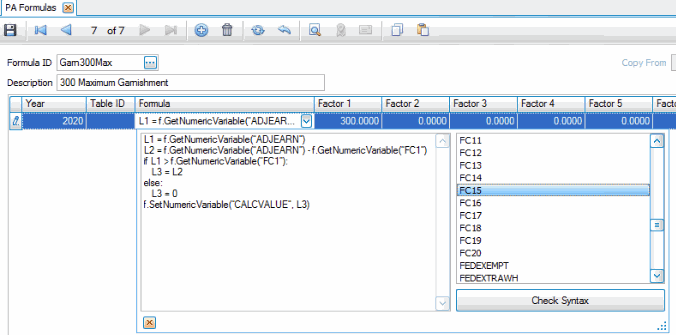
 - To make the formula as flexible as possible, use Factor 1 to store the value of the maximum amount of new pay, 300. Then, if we have more than one employee subject to this type of garnishment or if the maximum net pay for an employee changes, the net pay maximum (Factor 1) can be overridden on an individual employee basis without changing the lines of the formula.
- Click the drop-down list arrow in the Formula column to display the Formula box, into which to enter the formula.
- We will use the conditional function for this formula. The variable ADJEARN stores the adjusted earnings for net pay deductions (gross earnings minus withholdings and gross pay deductions at the time of calculating this net pay deduction). Enter L1 as:
L1 = f.GetNumericVariable(“ADJEARN”)This will bring in the adjusted earnings for the Employee.
NOTE: You can bring in the f.GetNumericVariable by double-clicking on it in the window on the right side of the Formula box. You can then enter a quotation mark “within the parentheses and double-click ADJEARN in the box on the right and close the quotation".
- Enter line 2 as:
L2 = f.GetNumericVariable(“ADJEARN”) - f.GetNumericVariable(“FC1”)This will calculate the difference between the adjusted earnings and the maximum amount the payroll check can be for this garnishment from Factor 1.
- Enter the if condition as follows:
if L1 > f.GetNumericVariable(“FC1”):L3 = L2else:L3 = 0This is saying if line 1 their adjusted earnings is greater than the amount in Factor 1 then use that amount, if that amount is greater than the factor then use the calculation in Line 2. Or else the value is 0 if Line 1 is less then Factor 1.
NOTE: It is important to use a constant number of spaces as indentations for the lines following the if and else command lines. The example above uses 3 spaces as indentations. At the end of the if and else command lines you must use a colon (:) to indicate what the next condition is.
- Enter the following to return the calculated value:
f.SetNumericVariable(“CALCVALUE” , L3)This will return the value calculated in line 3, which is the if, then, else conditional statement.
- Click Save.
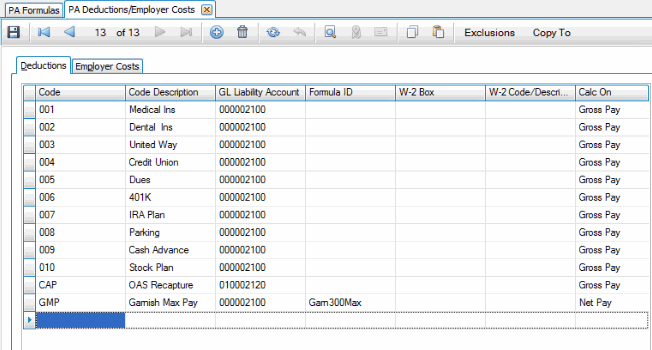
- On the Deductions tab, click New to add a new record.
- Enter the deduction Code and a Code Description for the garnishment deduction.
- Enter the Liability Account used for this deduction. This is the account that will be credited when you post checks.
- Select the Formula ID we just entered.
- Select 'Net Pay' in the Calc On column, since we are calculating the deduction on net pay.
This deduction should not print on the W-2, so leave the W-2 Box and W-2 Code/Description fields blank.
- Click the Save button and close the screen when you are finished.
- Enter the Employee ID of the employee to which you want to add the deductions, and select the Deductions tab.
- Scroll down to an empty record or click the Append button at the bottom of the screen to add this garnishment deduction to the employee’s scheduled deductions. Since this net deduction should be calculated after all other net deductions, enter it as the last deduction for the pay period. Select the Code for the deduction.
- The Description defaults from the deduction code. In the 1, 2, 3, 4, and 5 fields, enter an 'F' for Formula in the pay period column you want to have the deduction calculated. 'N' will default in the other pay period columns. Leave the Amount and Balance fields zero.

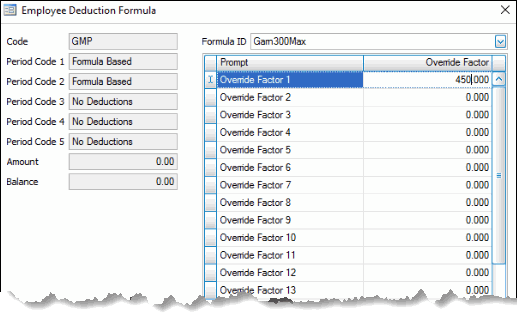
- If the garnishment for this employee allows their net pay to be an amount other than $300, you will need to override Factor 1 for this employee. In our example, Mike Doubla is subject to this garnishment deduction but can receive a net pay amount not to exceed $450. To override the factors for this formula, select the Formula button and use the Employee Deduction Formula dialog box.
- In the Employee Deduction Formula window, select the Formula ID and the appropriate Override Factor(s) for this employee. Since the formula for this deduction only uses Factor 1, that is the only factor we need to enter.
- NOTE: If a formula uses more than one factor but you only need to override one of them, you must still enter all of the factor values in the Employee Deduction Formula dialog box. Otherwise the other factors will be set to 0, the default amount.
- Enter '450' for Override Factor 1. When this deduction is calculated for Mike Doubla, the formula will use 450 as the value of Override Factor 1. If this garnishment deduction is used for other employees, the value of Factor 1 for the formula is still 300, unless an override factor is enter for that employee.
Enter the deduction in the Deductions/Employer Costs function on the PA Codes Maintenance menu.
To add this deduction for an employee, select the Employee Information function on the PA Setup and Maintenance menu.
This garnishment deduction is calculated after all other deductions and withholdings and requires that the maximum amount of the deduction is $200, but the amount of the deduction should never exceed more than 25% of the employee’s net pay.
Example: For an employee: if gross pay = $1,000, medical insurance deduction = $20, state and federal withholdings = $80, then net pay = $900. This garnishment deduction allows the maximum amount of the deduction to be $200, but should not exceed 25% of the net pay amount. 25% of $900 = $225, so the amount of this garnishment should be $200, the maximum.
Open the Formulas function from the PA Setup and Maintenance menu to enter the formula for this deduction.
- Use the New button to open a blank Formulas screen.
- Enter the Formula ID and Description for the new formula we are entering.
- Click the Append button at the bottom of the screen to add a new formula for the current payroll Year.
- To make this formula as flexible as possible, set up two factors. Factor 1 is set up equal to the maximum amount of the deduction: $200. The maximum percent of net pay, in decimal format, allowed for the deduction is the value of Factor 2: .25
- Click the drop-down list arrow in the Formula column to display the Formula box, into which to enter the formula.
- Enter line 1 as:
L1 = f.GetNumericVariable(“ADJEARN”)This will bring in the adjusted earnings for the Employee.
NOTE: You can bring in the
f.GetNumericVariableby double-clicking on it in the window on the right side of the Formula box. You can then enter a quotation mark “ within the parentheses and double-click ADJEARN in the box on the right and close the quotation “ . - Enter line 2 as:
L2 = f.GetNumericVariable(“FC1”)This will bring the value for Factor 1 into the formula.
- Enter line 3 as:
L3 = f.GetNumericVariable(“FC2”)This will bring the value for Factor 2 into the formula.
- Now we will do the conditional statement. Enter the next section which will be line 4 as follows:
if (L1 * L3) > L2:L4 = L2else:L4 = L1 * L3If 25% (L3) of ADJEARN (gross earnings minus withholdings and gross pay deductions at the time this deduction is calculated) is greater than $200 (L2), then the deduction amount will be $200 (L2). If 25% (L3) of ADJEARN is less than $200 (L2), then the amount of the deduction is 25% (L3) of ADJEARN.
- Enter the following to return the calculated value:
f.SetNumericVariable(“CALCVALUE” , L4)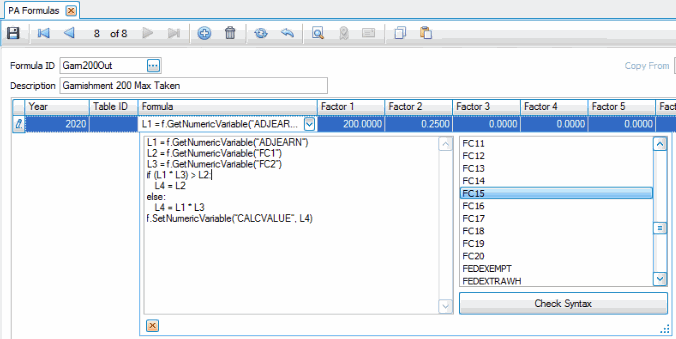
-
Save your changes.
- Set up the deduction using the Deduction/Employer Costs function on the Codes Maintenance menu. This is not an employer cost paid deduction or deferred compensation. This garnishment deduction is calculated on net pay. For details on setting up the deduction for employees, see the Creating a Maximum Net Pay Garnishment Formula section.
- To add the deduction for an employee, use the Employee Information function on the Setup and Maintenance menu. Enter the Employee ID and select the Deductions tab. Add this deduction to the employee’s scheduled deductions. If you need to override either or both of the formula factors, select Formula.
NOTE: Remember that, if you need to override any of the factors for an employee, both factors must be entered in the Employee Deduction Formula window.
For details on adding the deduction for employees, see this section in the Creating a Maximum Net Pay Garnishment Formula section.
This garnishment deduction is 20% of the employee’s net pay after all deductions have been taken.
Example: For an employee: if gross pay = $1,000, medical insurance deduction =$20, state and federal withholdings = $80, then net pay = $900. This garnishment deduction is calculated as 20% of the net pay, $180.
Open the Formulas function from the PA Setup and Maintenance menu to enter the formula for this deduction.
- Use the New button to open a blank Formulas screen.
- Enter the Formula ID and Description for the new formula we are entering.
- Click the Append button at the bottom of the screen to add a new formula for the current payroll Year.
- To make this formula as flexible as possible, set up two factors. The percent of net pay, in decimal format, allowed for the deduction is the value of Factor 1: .20
- Click the drop-down list arrow in the Formula column to display the Formula box, into which to enter the formula.
- Enter line 1 as below, where ret is the line ID:
ret = f.GetNumericVariable(“ADJEARN”) * f.GetNumericVariable(“FC1”) - To return the value calculated in the first line, enter the next line as:
f.SetNumericVariable(“CALCVALUE” , ret) - To have this deduction calculate after all other deductions, remember:
Any deductions set up as calculated on gross pay are calculated first and in the order they appear in the Scheduled Deduction section of the Employee Information Deductions tab. The employee’s withholdings are calculated next. Then all deductions set up as calculated on net pay are calculated in the order they appear in the Scheduled Deduction section of the Employee Information Deductions tab.
- To add this deduction to the Payroll system, use the Deduction/Employer Costs function on the Codes Maintenance menu. This garnishment deduction is not an employer cost paid deduction or deferred compensation, and will be calculated on net pay so that it is calculated after all gross pay deductions and withholdings.
- When you add this deduction for an employee, remember that since this deduction is to be calculated after all other deductions it should be the last deduction listed in the Employee Information Deductions tab. Then if the employee is taking other deductions calculated on net pay, they will be deducted before this garnishment deduction is calculated.
- For details on setting up the deduction for employees, see the Creating a Maximum Net Pay Garnishment Formula section.
- To add the deduction for an employee, use the Employee Information function on the Setup and Maintenance menu. Enter the Employee ID and select the Deductions tab. Add this deduction to the employee’s scheduled deductions. If you need to override either or both of the formula factors, select Formula.
NOTE: Remember that, if you need to override any of the factors for an employee, both factors must be entered in the Employee Deduction Formula window.
For details on adding the deduction for employees, see this section in the Creating a Maximum Net Pay Garnishment Formula section.
The employer 401K match is calculated by deducting the amount of the employee’s 401K contribution from the employee’s gross pay and then calculating the employer’s match as 25% of 3% of the employee’s gross pay after subtracting the employee’s 401K contribution. This example shows the importance of the order of the deductions on the Deduction tab in Employee Information when using the condition f.Deduction(id).
Example: If an employee’s gross pay is $1,000 and their 401K contribution is $30, which is 3%, the employee’s contribution is subtracted from the gross pay, $1,000 - $30 = $970. The employer will calculate his match on 3% of the $970, $970*3% = $29.10, with a 25% match, $29.10* 25% = $7.28.
Set up the formula from the same screen using the Formulas function. This formula is similar to the one we used when we covered the Deduction section except for the subtraction of the employee’s 401K contribution from gross pay before calculating the employer’s match.
Open the Formulas function from the PA Setup and Maintenance menu to enter the formula for this employer cost.
- Use the New button to open a blank Formulas screen.
- Enter the Formula ID as '401K25_3Max', and the Description of 'Gross-Emp 401K Contrib; 25 Max 3%' for the new formula we are entering.
- Click the Append button at the bottom of the screen to add a new formula for the current payroll Year.
- Enter '3.0000' into Factor 1 and skip the remaining Factors.
- Click the drop-down list arrow in the Formula column to display the Formula box, into which to enter the formula.
- Enter line 1 as:
L1 = f.GetNumericVariable(“ADJEARN”) - f.Deduction("006")(006 is the Deduction Code for the employee 401K)
- Enter line 2 as:
L2 = (L1 * (f.GetNumericVariable(“FC1”) * .01)) * .25 - Enter the next line as:
f.SetNumericVariable(“CALCVALUE” , L2)This returns the value calculated in line 2.
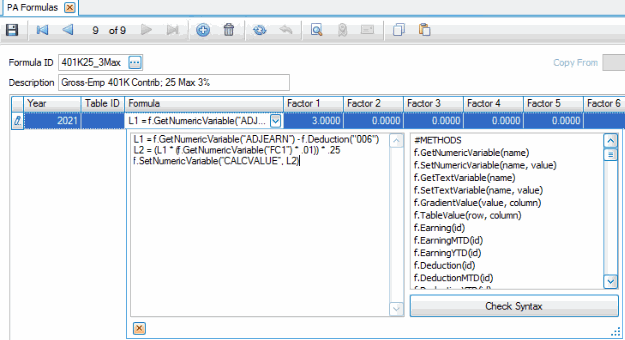
L1 is multiplied by FC1, the percent of the employee’s pay that the employer will match, and then multiplied by .25 to calculate the actual amount of the employer’s contribution.
-
Save your changes.
- Set up the deduction using the Deduction/Employer Costs function on the Codes Maintenance menu.
- Because this is an employer cost, select the Employer Costs tab, click New to add a new record.
- Enter a descriptive Code and a Code Description.
- Enter the Liability Account used for this deduction. This is the account that will be credited when you post checks.
- Select the Formula ID we just entered.
- Enter '14' as the W-2 Box to print the amount in Box 14 of the employee's W-2 form if you want the amount printed; otherwise, leave the field blank.
- Select 'Gross Pay' in the Calc On column.
- Click the Save button and close the screen when you are finished.

- Enter the Employee ID of the employee to which you want to add the match, and select the Employer Cost tab.
- Scroll down to an empty record or click the Append button at the bottom of the screen. Select the Code for your 401K match.
- The Description defaults from the employer cost code. In the 1, 2, 3, 4, and 5 fields, enter an 'F' for Formula in the pay period column you want to have the match calculated. 'N' will default in the other pay period columns. Leave the Amount and Balance fields zero.

- If the employee is contributing less than the 3% maximum employer match, select the Formula button and use the Employer Cost Formula dialog box.
- In the Employer Cost Formula window, select the Formula ID and set Override Factor 1 to the correct percentage for this employee.
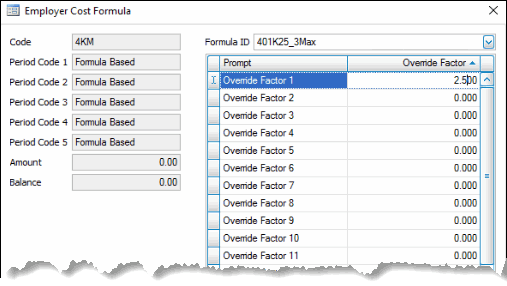
Enter the employer cost in the Deductions/Employer Costs function on the PA Codes Maintenance menu.
To add this for an employee, select the Employee Information function on the PA Setup and Maintenance menu.
This 401K match will look at the employee’s adjusted earnings, their net pay after all deductions and taxes have been taken out, and then calculate 3% of what is left and match 50% of the 3% calculated.
Example: The formula uses the ADJEARN variable to calculate the net pay so it can match 50% of the remaining 3% of the employee’s pay.
Open the Formulas function from the PA Setup and Maintenance menu to enter the formula for this deduction.
- Use the New button to open a blank Formulas screen.
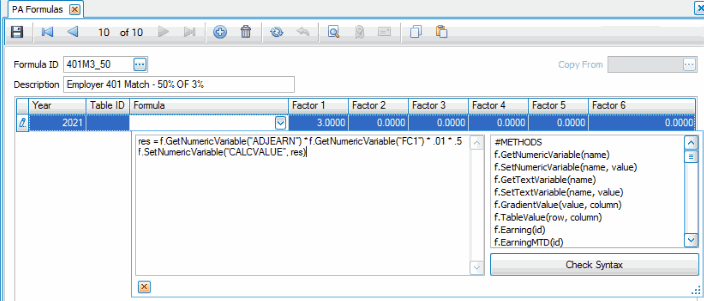
- Enter the Formula ID as '401M3_50', and the Description of 'Employer 401 Match - 50% OF 3%' for the new formula we are entering.
- Click the Append button at the bottom of the screen to add a new formula for the current payroll Year.
- Enter '3.0000' into Factor 1 and skip the remaining Factors.
- Click the drop-down list arrow in the Formula column to display the Formula box, into which to enter the formula.
- Enter line 1 as:
res = f.GetNumericVariable(“ADJEARN”) * f.GetNumericVariable(“FC1”) * .01 * .5 - For the second line to return the value calculated enter:
f.SetNumericVariable(“CALCVALUE” , es)The value 'res' is considered the line number in this case and that is the value that is being returned with the final statement. This is another example of how line number values can vary.
-
Save your changes.
- Set up the employer cost using the Deduction/Employer Costs function on the Codes Maintenance menu.
- Because this is an employer cost, select the Employer Costs tab, click New to add a new record.
- Enter a descriptive Code and a Code Description.
- Enter the Liability Account used for this deduction. This is the account that will be credited when you post checks.
- Select the Formula ID we just entered.
- Enter '14' as the W-2 Box to print the amount in Box 14 of the employee's W-2 form if you want the amount printed; otherwise, leave the field blank.
- Select 'Net Pay' in the Calc On column.
- Click the Save button and close the screen when you are finished.

- Enter the Employee ID of the employee to which you want to add the match, and select the Employer Cost tab.
- Scroll down to an empty record or click the Append button at the bottom of the screen. Select the Code for your 401K match.
- The Description defaults from the employer cost code. In the 1, 2, 3, 4, and 5 fields, enter an 'F' for Formula in the pay period column you want to have the match calculated. 'N' will default in the other pay period columns. Leave the Amount and Balance fields zero.

- Save your changes.
Enter the employer cost in the Deductions/Employer Costs function on the PA Codes Maintenance menu.
To add this for an employee, select the Employee Information function on the PA Setup and Maintenance menu.
This 401K employer’s match, will match 50% of the amount of the 401K deduction taken out of the employee’s paycheck. This formula uses the GETDEDUCTION variable to get the amount of the deduction we specify in the formula to match 50% of that amount as the employer cost.
Open the Formulas function from the PA Setup and Maintenance menu to enter the formula for this deduction.
- Use the New button to open a blank Formulas screen.
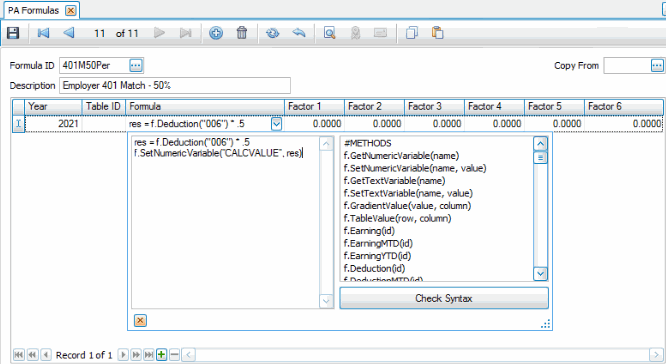
- Enter the Formula ID as '401M50Per', and the Description of 'Employer 401 Match - 50%' for the new formula we are entering.
- Click the Append button at the bottom of the screen to add a new formula for the current payroll Year.
- Skip the Factors.
- Click the drop-down list arrow in the Formula column to display the Formula box, into which to enter the formula.
- Enter line 1 as:
res = f.Deduction(“006”) * .5 - For the second line to return the value calculated enter:
f.SetNumericVariable(“CALCVALUE” , es)The value 'res' is considered the line number in this case and that is the value that is being returned with the final statement. This is another example of how line number values can vary.
- Set up the employer cost using the Deduction/Employer Costs function on the Codes Maintenance menu.
- Because this is an employer cost, select the Employer Costs tab, click New to add a new record.
- Enter a descriptive Code and a Code Description.
- Enter the Liability Account used for this deduction. This is the account that will be credited when you post checks.
- Select the Formula ID we just entered.
- Enter '14' as the W-2 Box to print the amount in Box 14 of the employee's W-2 form if you want the amount printed; otherwise, leave the field blank.
- Select 'Gross Pay' in the Calc On column.
- Click the Save button and close the screen when you are finished.

- Enter the Employee ID of the employee to which you want to add the match, and select the Employer Cost tab.
- Scroll down to an empty record or click the Append button at the bottom of the screen. Select the Code for your 401K match.
- The Description defaults from the employer cost code. In the 1, 2, 3, 4, and 5 fields, enter an 'F' for Formula in the pay period column you want to have the match calculated. 'N' will default in the other pay period columns. Leave the Amount and Balance fields zero.

- Save your changes.
Enter the employer cost in the Deductions/Employer Costs function on the PA Codes Maintenance menu.
To add this for an employee, select the Employee Information function on the PA Setup and Maintenance menu.
A negative overtime deduction will add an amount to the employee’s paycheck as a deduction for the hours they work that are considered overtime. When you set up a deduction as a negative number, it will add to the employee’s pay instead of taking away from the pay.
Example: We will be calculating the amount of pay that is strictly overtime and adding it to the employee’s paycheck as a deduction.
Enter the formula in the Formulas function (PA Setup and Maintenance menu):
- Use the New button on the toolbar to create a new record.
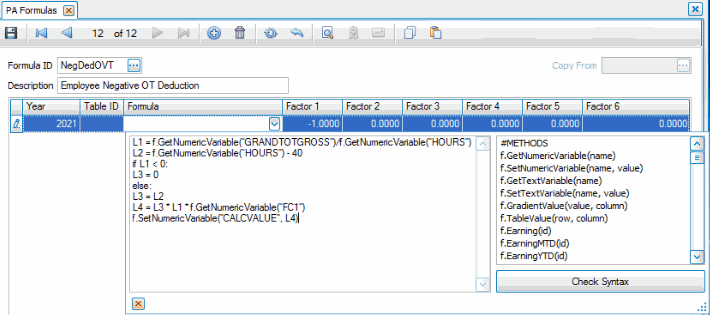
- Enter the Formula ID as 'NegDedOVT', and the Description of 'Employee Negative OT Deduction' for the new formula we are entering.
- Use the Append button (
 ) to add a new formula for the current payroll year.
 - Enter '-1.0000' into Factor 1 and skip the remaining Factors.
- Click the drop-down list arrow in the Formula column to display the Formula box, into which to enter the formula.
- For line 1 enter:
L1 = (“GRANDTOTGROSS”)/f.GetNumericVariable(“HOURS”) - For line 2 enter:
L2 = f.GetNumericVariable(“HOURS”) - 40 - For line 3 enter:
if L1 < 0:L3 = 0else:L3 = L2NOTE: It is important to use a constant number of spaces as indentations for the lines following the if and else command lines. The example above uses 3 spaces as indentations. At the end of the if and else command lines you must use a colon (:) to indicate what the next condition is.
- For the next line enter:
L4 = L3 * L1 * f.GetNumericVariable(“FC1”) - Enter the following to return the calculated value:
f.SetNumericVariable(“CALCVALUE” , L4)This will return the value calculated in line 3, which is the if, then, else conditional statement.
- Click Save.
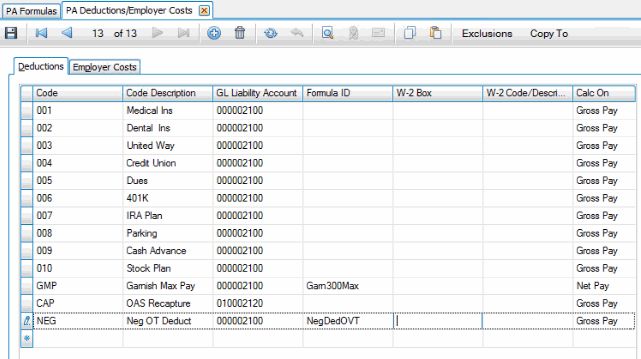
- On the Deductions tab, click New to add a new record.
- Enter the deduction Code and a Code Description for the deduction.
- Enter the Liability Account used for this deduction. This is the account that will be credited when you post checks.
- Select the Formula ID we just entered.
- Select 'Gross Pay' in the Calc On column.
This deduction should not print on the W-2, so leave the W-2 Box and W-2 Code/Description fields blank.
- Click the Save button and close the screen when you are finished.
- Enter the Employee ID of the employee to which you want to add the deductions, and select the Deductions tab.
- Scroll down to an empty record or click the Append button at the bottom of the screen to add this deduction to the employee’s scheduled deductions. Select the Code for the deduction.
- The Description defaults from the deduction code. In the 1, 2, 3, 4, and 5 fields, enter an 'F' for Formula in the pay period column you want to have the deduction calculated. 'N' will default in the other pay period columns. Leave the Amount and Balance fields zero.

- Save your changes.
Enter the deduction in the Deductions/Employer Costs function on the PA Codes Maintenance menu.
To add this deduction for an employee, select the Employee Information function on the PA Setup and Maintenance menu.
The production bonus will use a negative deduction to add a dollar amount to the employee’s paycheck for hours they work over the regular hours with the overtime calculated and time and a half. When a negative deduction amount is used, the result is adding an amount to the employee’s paycheck instead of deducting from it.
Enter the formula in the Formulas function (PA Setup and Maintenance menu):
- Use the New button on the toolbar to create a new record.
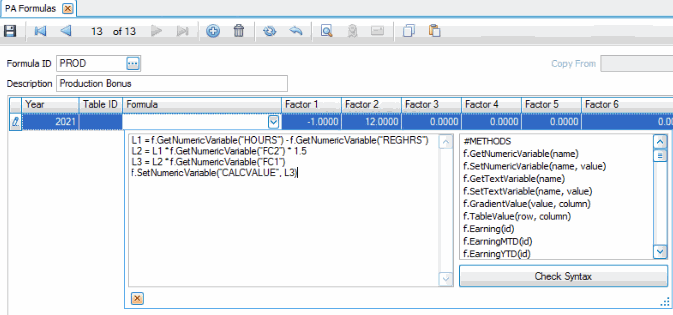
- Enter the Formula ID as 'PROD', and the Description of 'Production Bonus' for the new formula we are entering.
- Use the Append button (
 ) to add a new formula for the current payroll year.
 - Enter '-1.0000' into Factor 1 and '12.00' for Factor 2. Skip the remaining Factors. Factor 2 will be the employee's hourly wage.
- Click the drop-down list arrow in the Formula column to display the Formula box, into which to enter the formula.
- For line 1 enter:
L1 = f.GetNumericVariable(“HOURS”) - f.GetNumericVariable(“REGHRS”) - For line 2 enter:
L2 = L1 * f.GetNumericVariable(“FC2”) * 1.5 - For line 3 enter:
L3 = L2 * f.GetNumericVariable(“FC1”) - Enter the following to return the calculated value:
f.SetNumericVariable(“CALCVALUE” , L3)This will return the value calculated in line 3.
- Click Save.
- To add this deduction to the Payroll system, use the Deduction/Employer Costs function on the Codes Maintenance menu. For details on setting up the deduction for employees, see the Creating a Maximum Net Pay Garnishment Formula section.
- To add the deduction for an employee, use the Employee Information function on the Setup and Maintenance menu. Enter the Employee ID and select the Deductions tab. Add this deduction to the employee’s scheduled deductions. Select Formula and use the Override Factor 2 to put in the regular wage amount override factor for each employee.
NOTE: Remember that, if you need to override any of the factors for an employee, both factors must be entered in the Employee Deduction Formula window.
For details on adding the deduction for employees, see this section in the Creating a Maximum Net Pay Garnishment Formula section.
- Save your changes.
This is a generic description of how to set up a workman’s compensation employer’s cost or employee deduction. This example will take a percent of the employee’s adjusted earnings, after taxes and deductions and calculate a deduction from that calculated amount.
Enter the formula in the Formulas function (PA Setup and Maintenance menu):
- Use the New button on the toolbar to create a new record.
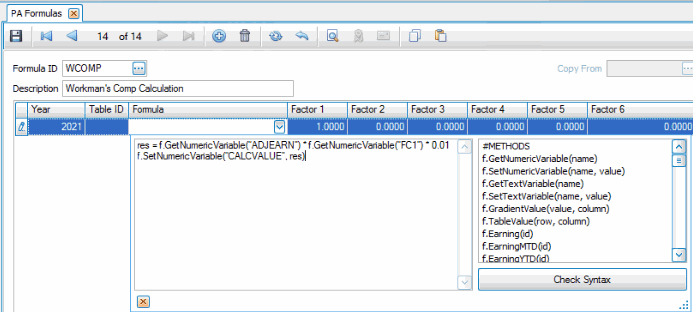
- Enter the Formula ID as 'WCOMP', and the Description of 'Workman's Comp Calculation' for the new formula we are entering.
- Use the Append button (
 ) to add a new formula for the current payroll year.
 - Enter '1.0000' into Factor 1 and skip the remaining Factors.
- Click the drop-down list arrow in the Formula column to display the Formula box, into which to enter the formula.
- For line 1 enter:
res = f.GetNumericVariable(“ADJEARN”) * f.GetNumericVariable(“FC1”) * 0.01 - Enter the following to return the calculated value:
f.SetNumericVariable(“CALCVALUE” , res)The value 'res' is considered the line number in this case and that is the value that is being returned with the final statement. This is another example of how line number values can vary.
- Click Save.
- To add this deduction to the Payroll system, use the Deduction/Employer Costs function on the Codes Maintenance menu. For details on setting up the deduction for employees, see the Creating a Maximum Net Pay Garnishment Formula section.
- To add the deduction for an employee, use the Employee Information function on the Setup and Maintenance menu. Enter the Employee ID and select the Deductions tab. Add this deduction to the employee’s scheduled deductions. Select Formula and use the Override Factor 1 to put in the Workman's Comp percent amount override factor for each employee.
NOTE: Remember that, if you need to override any of the factors for an employee, both factors must be entered in the Employee Deduction Formula window.
For details on adding the deduction for employees, see this section in the Creating a Maximum Net Pay Garnishment Formula section.
- Save your changes.
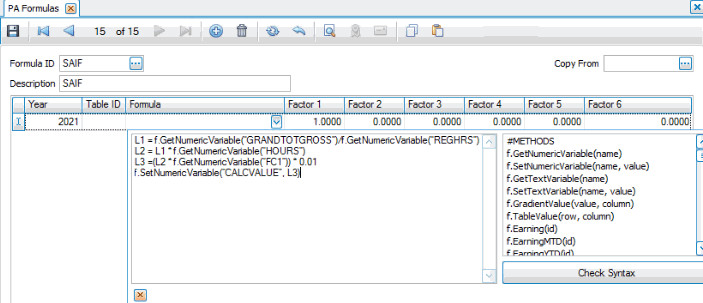
SAIF is used in some states to deduct from the employee’s paycheck to pay for an employee-paid disability tax. SAIF is set up as a deduction and then the employer will pay the state from the amount deducted from the employee’s paycheck.
Example: This example will take 1% of each hour of regular pay the employee works.
Enter the formula in the Formulas function (PA Setup and Maintenance menu):
- Use the New button on the toolbar to create a new record.
- Enter the Formula ID as 'SAIF', and the Description of 'SAIF' for the new formula we are entering.
- Use the Append button (
 ) to add a new formula for the current payroll year.
 - Enter '1.0000' into Factor 1 and skip the remaining Factors.
- Click the drop-down list arrow in the Formula column to display the Formula box, into which to enter the formula.
- For line 1 enter:
L1 = f.GetNumericVariable(“GRANDTOTGROSS”)/f.GetNumericVariable(“REGHRS”)This will calculate their hourly rate.
- For line 2 enter:
L2 = L1 * f.GetNumericVariable(“HOURS”)This will calculate their regular pay.
- For line 3 enter:
L3 =(L2 * f.GetNumericVariable(“FC1”)) * 0.01This will calculate the amount of the tax.
- Enter the following to return the calculated value:
f.SetNumericVariable(“CALCVALUE” , L3) - Click Save.
- To add this deduction to the Payroll system, use the Deduction/Employer Costs function on the Codes Maintenance menu. For details on setting up the deduction for employees, see the Creating a Maximum Net Pay Garnishment Formula section.
- To add the deduction for an employee, use the Employee Information function on the Setup and Maintenance menu. Enter the Employee ID and select the Deductions tab. Add this deduction to the employee’s scheduled deductions. Select Formula and use the Override Factor 1 to put in the SAIF amount override factor for each employee.
For details on adding the deduction for employees, see this section in the Creating a Maximum Net Pay Garnishment Formula section.
- Save your changes.