Traverse Standard v11.0
Bill of Lading
The Bill of Lading function allows you to create a bill of lading report based on standard input documents and input from the Sales Order application.
Before creating a bill of lading, set the Business Rules relating to the Bill of Lading function.
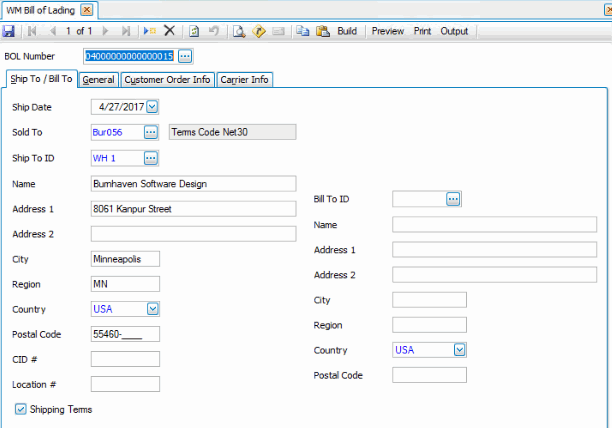
To create a new Bill of Lading, use the New button on the toolbar. The system will create a new BOL Number. If you are editing a BOL, select a BOL Number from the drop-down list.
- Accept or edit the Ship Date.
- Select the customer to which you sold the item in the Sold To field. If you do not select a company from the Sold To drop-down list, you must enter the Name and Address information manually.
- If necessary, select a different shipping address for the bill of lading in the Ship To ID field. The Accounts Receivable Customer record must have a Ship-To ID defined on the Customer Ship To tab in order to select an ID from this field.
- Enter or edit the Name of the company or company contact for shipping purposes.
- Enter or edit the shipping address in the appropriate fields (Address 1, Address 2, City, Region, Country, Postal Code).
- If applicable, enter Cosignee Identification number (CID) in the CID # field.
- If applicable, enter the 13 digit number for legal entities, functional entities, and physical locations in the Location # field.
- Mark the Shipping Terms check box to select whether the recipient is to take responsibility of the shipment at the point of delivery. Note: The Shipping Terms check box must be checked on either the Ship To/Bill To tab or the General tab to determine who is taking responsibility for the goods being shipped. The Shipping Terms check boxes on the two tabs cannot match.
- Select a different customer for billing purposes from the Bill To ID drop-down list, if necessary.
- Enter or edit the billing address as needed, if different from the shipping address, in the appropriate fields (Address 1, Address 2, City, Region, Country, Postal Code).
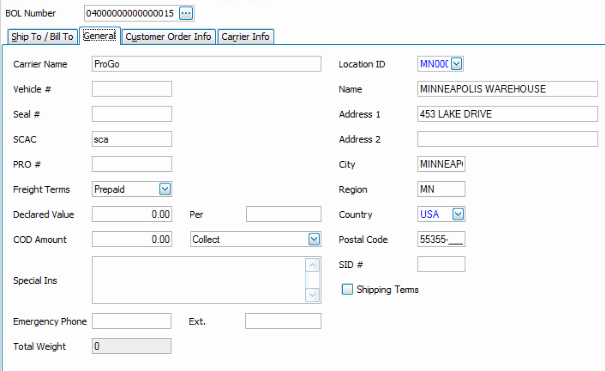
- Enter the Carrier Name for the bill of lading as applicable.
- Select the originating Location ID for the shipment.
- Use the appropriate address fields to enter or edit the originating shipping address.
- Enter the vehicle number for the carrier, if applicable, in the Vehicle # field.
- Enter the Seal # for the shipment, as applicable.
- Enter the standard carrier alpha code (SCAC) for the shipment, as applicable.
- Enter the carrier assigned shipment number in the PRO # field, as applicable.
- Select the terms of the freight in the Freight Terms drop-down list.
- If applicable, enter the Declared Value of the shipment. If the value listed is per a certain unit or weight, enter that unit measure in the Per field.
- Enter the COD amount, as necessary. Enter whether the amount is Collect or Prepaid in the adjacent field.
- Enter any special instructions for the bill of lading in the Special Ins field.
- If applicable, enter an emergency contact phone number in the Emergency Phone and Ext fields. This field is required if the shipment contains hazardous materials.
- The view-only Total Weight field displays the total weight of the shipment.
- If applicable, enter the shipper identification number in the SID # field.
- Mark the Shipping Terms check box to select whether the recipient is to take responsibility of the shipment at the point of delivery. Note: The Shipping Terms check box must be checked on either the Ship To/Bill To tab or the General tab to determine who is taking responsibility for the goods being shipped. The Shipping Terms check boxes on the two tabs cannot match.
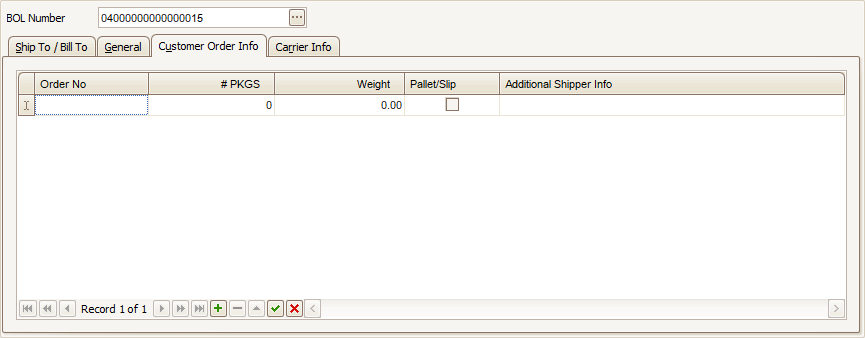
Use the Append button at the bottom of the screen to add a blank record.
- Enter the customer Order No(s) included in the shipment.
- Enter the number of packages in the shipment for the selected order in the # PKGS field.
- Enter the Weight of the selected order.
- Mark the check box if the order is on a Pallet/Slip.
- Add any additional information for the shipper in the Additional Shipper Info field.
- Use the Verify button at the bottom of the screen to complete the entry.
If you use the Build button to import the bill of lading information from Sales Order, the data from the chosen sales order will appear on this tab.
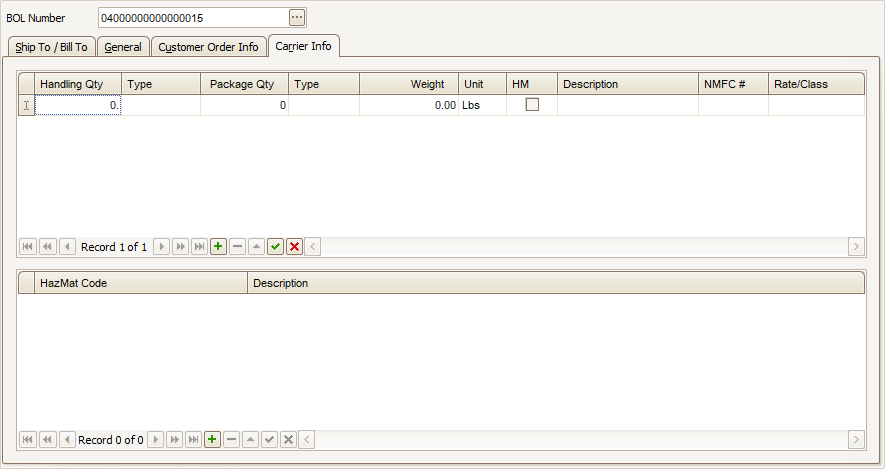
Use the Append button at the bottom of each section to add a blank record.
In the upper section of the screen:
- Enter the Handling Qty for the shipment. Enter the associated Type of units of measure.
- Enter the Package Qty for the shipment. Enter the associated package Type.
- Enter the Weight and Unit of weight for the record.
- If the item has a hazardous material code classification, mark the HM check box.
- Enter a Description for the item record.
- Enter the National Motor Freight Classification number (NMFC #) for the record item in the shipment.
- Enter the Rate/Class for the shipment record.
In the lower section of the screen:
- If you marked the HM check box, select a hazardous material code from the HazMat Code drop-down list.
- If necessary, edit the Description of the hazardous material code.
- Use the Verify button at the bottom of the screen to complete the entry.
| Click | To |
|---|---|
| Build | Create the Bill of Lading. See the Build topic for more information. |
| Preview | View a preview of the BOL. |
| Process the BOL. | |
| Output | Output the BOL as a PDF. |