Traverse Standard v11.0
Request Routes
Use the PO Request Routes function to set up approval routes for PO requests that originate in the PO Approvals process.
Request Routes are used to identify the route of users the approval process needs to go through before an order request can be approved and made into a purchase order transaction. The users allowed to add requests to this route are also set up here. When the request has been made into a purchase order transaction, an email is sent notifying that the request has been through the whole approval process.
To add a PO Request route:

- Use the New button on the toolbar to open a blank record.
- Enter a Route ID for the route. This may be up to 10 alpha-numeric characters.
- Enter a description for the route in the Description field. This is a 100-character field.
- If the route is not active, mark the Inactive check box (used for history purposes); otherwise clear the check box.
Detail tab
Add users to approve requests on the route and specify which approver(s)s the request will be routed to. For each level (Level 1 is the first approver, Level 2 is the second approver, etc.) of approval:
- Use the Append button (
 ) to add a level (step) to the route. The level will fill in automatically.
 - Select a User ID for the level of approval from the drop-down list. Only users that are set up as either 'Approver' or 'Both' in the Request Users screen will be available to select.
- Enter the Min Amount and the Max Amount for the level. The dollar amount (inclusive) of the PO request will determine which users must approve the request. Enter a Min and Max amount of 0 to have all requests at that level on the route sent to the user.
- Mark the Check Budget check box if the user is required to approve the request if it is expected to exceed the budget, if applicable.
- Use the Add link to save the level and add a new level. Use the Cancel link to cancel the entry.
Users tab

Use the Append button ( ) to add users who are able to use this route when submitting a request.
Approved PO tab

- Mark the Notify Vendor check box if you want the vendor to be notified by email of the approved PO. The vendor must be set up in Document Delivery for this setting to be valid.
- Add email addresses to be notified by email that the PO has been approved by using the Append button and entering a valid email address.
Save your changes.

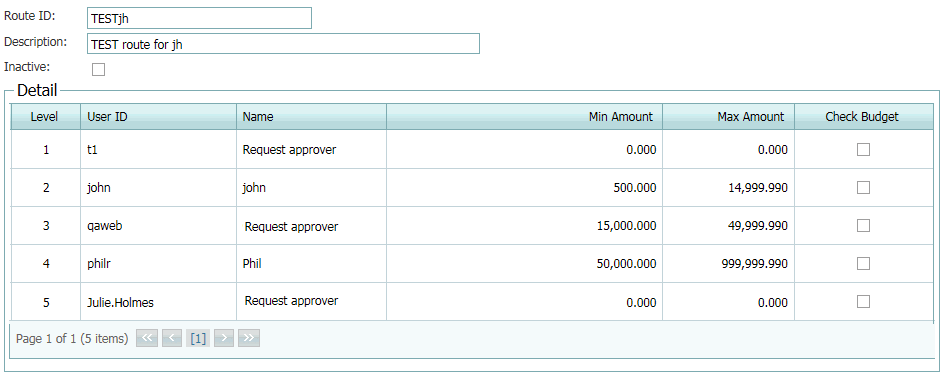
Here is an example of the route logic for the above sample (Min and Max Amounts are inclusive):
t1 will always be included with every request due to his role with handling the request.
john will only be involved if the total of the PO--including any taxes, freight or miscellaneous amounts--falls between $500 and $14,999.99.
qaweb will be involved if the PO amount is equal to or greater than $15,000, and equal to or less than $49,999.99.
philr will be responsible for POs from $50,000.00 to $999,999.99.
Julie.Holmes will always be the last person to approve the request.
Route A is set up as (all amounts are inclusive):
- User 1 -- approve $50 or more
- User 2 -- approve $100 or more
- User 3 -- approve $200 or more
- User 4 -- approve $400 or more
- User 5 -- approve $500 or more and budget approval
Example 1:
A request is placed for a total of $325 (including sales tax, misc, and freight amounts).
User 1 would receive an email that the request was placed.
Users 1, 2, 3, and 5 would all see the request (User 5 can see it because of the budget check) on their Approval Request View.
After User 1 approves it, an email would be sent to User 2. Alternately, User 3, without waiting for User 1, could approve it and it would become a PO assuming it does not exceed the budget.
Example 2:
A request is submitted for a total of $49.99. When submitted, it will immediately become a PO assuming it does not exceed budget.
Example 3:
A request is submitted for a total of $400 that is within budget.
User 3 approves the request immediately, jumping over User 1 and User 2. User 4 will then be notified.