Traverse Standard v11.0
PO Request Routes
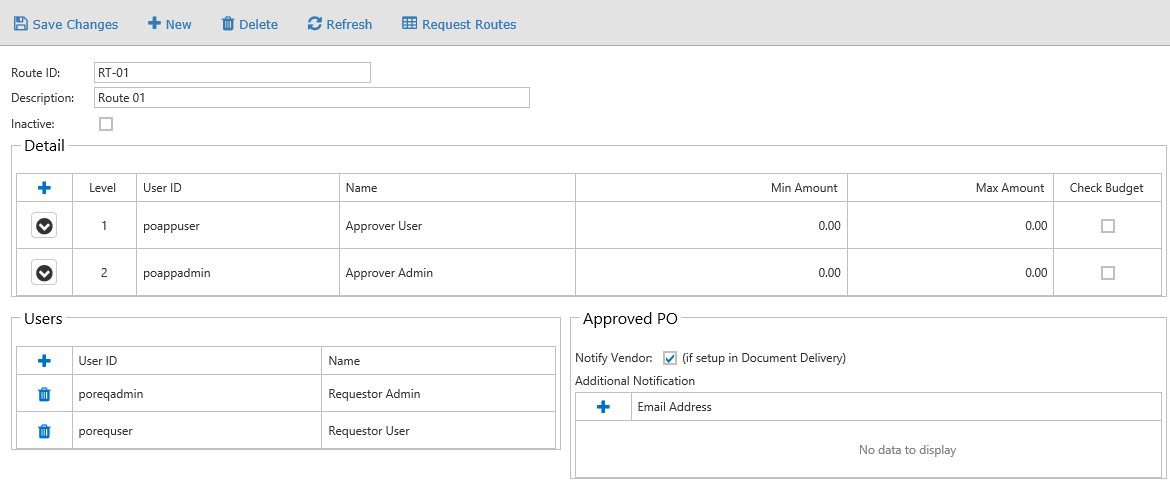
Use the PO Request Routes function to set up approval routes for PO requests that originate in the PO Approvals portal.
Open the PO Request Routes page from the Approvals drop-down menu.
To add a PO Request route:

- Use the Add icon in the toolbar to open the Request Route screen.
- Enter a Route ID for the route.
- Enter a description for the route in the Description field.
- If the route is not active, mark the Inactive check box; otherwise clear the check box.
- Add detail to the route, to specify which approvers the request will be routed to. For each level (Level 1 is the first approver, Level 2 is the second approver, etc.) of approval:
- Use the Add icon (
 ) to add a level (step) to the route.
 - Select a User ID for the level of approval from the drop-down list. The user's name will appear in the Name field once the level is saved.
- Enter the Min Amount and the Max Amount for the level. The dollar amount of the PO request will determine which users must approve the request. Enter a Min and Max amount of 0 to have all requests at that level on the route sent to the user.
- Mark the Check Budget check box if the user is required to approve the request if it is expected to exceed the budget, if applicable.
- Use the Add link to save the level and add a new level. Use the Cancel link to cancel the entry.
- Use the Add icon (
- In the Users section, use the Add icon to add users who are able to use this route when submitting a request.
- In the Approved PO section:
- Mark the Notify Vendor check box if you want the vendor to be notified by email of the approved PO. The vendor must be set up in Document Delivery for this setting to be valid.
- Add email addresses to be notified by email that the PO has been approved by using the Add icon and entering a valid email address. Use the Add link to save the level and add a new level. Use the Cancel link to cancel the entry.
- Use the command buttons to:
| Click | To |
| Save Changes | Save the route and associated changes. |
| New | Create a new route. |
| Delete | Delete the current route. |
| Refresh | Reload the web page. |
| Request Routes | Return to the request routes page. |
To edit a route:
- Use the Edit icon (
 ) for the route you want to edit.
 - Make any changes to the route information.
- Use the command buttons to:
| Click | To |
| Save Changes | Save the route and associated changes. |
| New | Create a new route. |
| Delete | Delete the current route. |
| Refresh | Reload the web page. |
| Request Routes | Return to the request routes page. |
To delete a route:
- Click the Delete icon for the route you want to delete.
- Click Yes at the "Are you sure you want to delete selected record(s)" prompt.

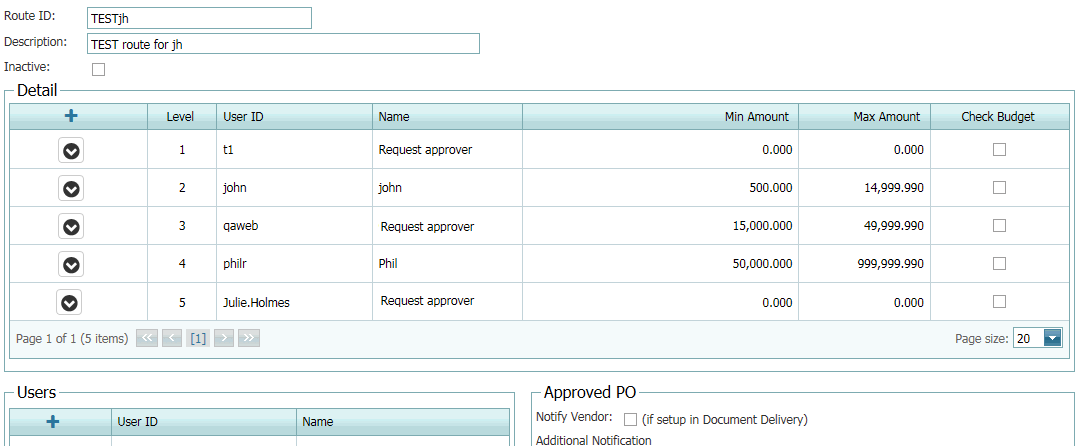
Here is an example of the route logic for the above sample (Min and Max Amounts are inclusive):
t1 will always be included with every request due to his role with handling the request.
john will only be involved if the total of the PO--including any taxes, freight or miscellaneous amounts--falls between $500 and $14,999.99.
qaweb will be involved if the PO amount is equal to or greater than $15,000, and equal to or less than $49,999.99.
philr will be responsible for POs from $50,000.00 to $999,999.99.
Julie.Holmes will always be the last person to approve the request.