Traverse Standard v11.0
Costed Bills of Material
Use the Costed Bill of Material report to view what costs make up a BOM and where these costs come from. A BOM consists of materials, byproducts (which are materials created as a result of the manufacturing process and have some value), subcontracting, and operations. BOMs may also contain routing steps to which you can attach a list of materials and byproducts. Byproducts are a result of routing steps and materials are used to complete routing steps.
The Costed Bills of Material Report is designed to give you a printed copy of all the costs that go into a bill of material resulting in a total product cost based on current standard costs or optionally, component last costs. The report lists out each process from start to finish, listing material components within those routing steps. Queue time, Wait time, and Move time need not be shown on the report since they are not costed items. Non-Inventory items and As Needed Items appear on the report although As Needed Item may not add cost to the bill.
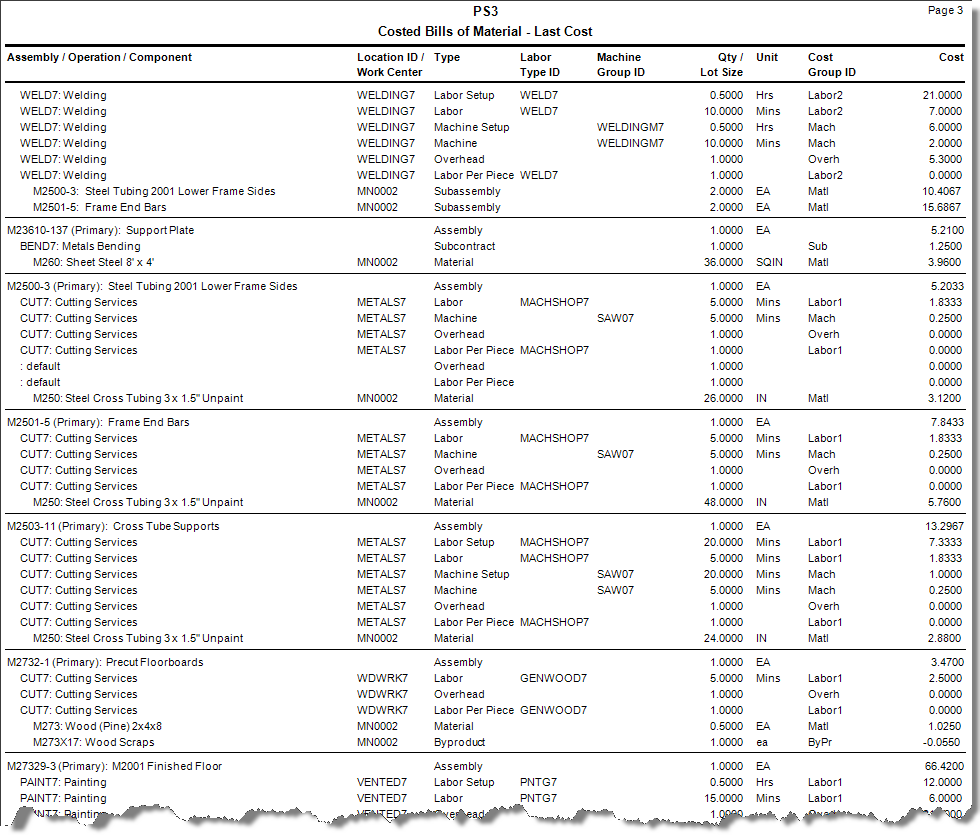
If you interface with Routing and Resources, the report is indented to show operations and further indented to show material components. The costs that appear at the right vary depending on whether or not you chose to print the report using last cost or standard cost. Using Last Cost, the report provides an accurate idea of what the assemblies actually cost. Choosing Standard Cost, the report displays what the assemblies cost based on standard cost and match the Cost summary section found in the Bills of Material inquiry or Bills of Material setup functions.
The first line of each report section shows the assembly or product ID being produced and its description. The type always appears as “Assembly” for this line. The Labor Type ID and Machine Group ID are blank. The Lot Size, and Unit of Measure are the respective fields from the General area. Finally the total calculated cost of the item appears to the far right.
Below the Assembly line are the various cost lines of the report. These consist of Labor Setup Costs, Machine Setup Costs, Overhead (Work Center) costs, Material costs, and Subcontracting costs. On the far right side of the report is the cost contribution of that specific cost area to the total cost of the assembly.
Note: Subcontracted steps are actually routing steps and are listed as such in the report.
The report only prints one level BOMs, indenting routing steps and further indenting their material components. The report actually calculates the standard cost of non-stocked subassemblies that print on the report so those costs should be very accurate as they include all lower level routing and material costs. This also means that if one was to look at the stated standard cost in inventory or on the bill of material for a non-stocked subassembly, one might find it would be different than the amount that prints on the report.
Machine Setup, Labor Setup, Labor Run, and Machine run costs print very similarly. However, the Qty and Cost may be calculated differently depending on whether the process is considered a Per Unit, Batch or Run Rate process. The Location ID/Work Center will print the name of the Work Center for these lines. Type will appear as Labor, Machine, Machine Setup, or Labor Setup. The Labor Type ID and Machine Group ID will appear accordingly. The Qty/Lot Size should generally equate to the time to run one piece or one unit. The Unit is going to be Hrs, Mins, or Secs. Cost Group ID prints the cost group assigned to that machine group or labor type and finally the cost, is the cost contribution to the total cost of the product that this line provides.
Material components will appear below the operation or routing step they have been assigned to and are indented slightly from the operations. They will print their location and type, which always appears as Material. The labor type ID and machine ID are not applicable and appear blank. The Qty field holds the quantity to be used. Unit is the Unit of Measure. Cost Group shows the cost group assigned to that material in the bill of material, and finally the Cost is the unit cost multiplied by the quantity. As Needed and Non-Inventory components also appear on the report.
- Use the Data Filter to select the range of filtering options or leave the filter blank to include all available data.
- Select whether to include last or standard cost in the report from the Costing Option section.
- Select the type of Routing to include in the report.
- Select the Scrap Quantities check box, if applicable, to include scrap quantities in the report.
- Select the Banded Rows check box, if applicable, to highlight alternating lines on the report to make the report easier to read.
Note: Use the System Manager Print Preferences function to define the default setting for this check box. You can then override this default when you print the report. - Click a command button to
| Select | To |
| Print the Costed Bills of Material report using the selected criteria. | |
| Output | Output the list as a PDF. |
| Send | Save the list as a PDF and attach it to an email using your default mail program. |
| Preview | Preview the Costed Bills of Material report using the selected criteria. |
| Reset | Reset all fields and lists to their default selections. |
