Traverse Standard v11.0
Aged Trial Balance View
Use the Aged Trial Balance View to retrieve information about vendors and aged invoices. The Aged Trial Balance View provides much of the same information as the Aged Trial Balance Report; however, the Aged Trial Balance View provides you with greater flexibility.
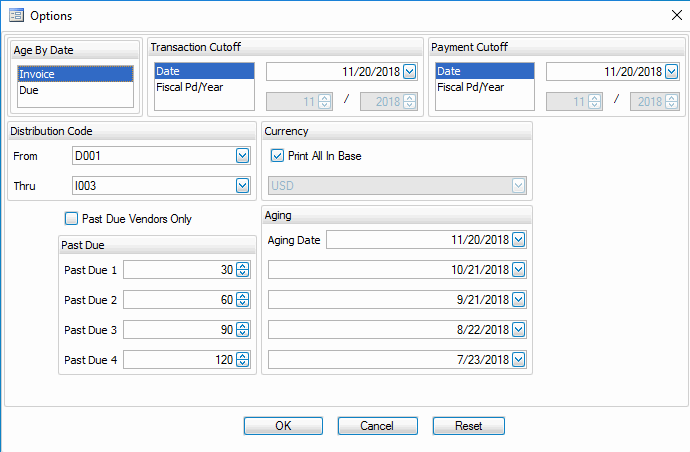
Use the Options button to open the Options screen to apply cutoff dates, past due dates, and other miscellaneous options to the view:
- Select whether to age the information by Invoice date or Due date from the Age By section.
- Select a point at which you want to cut off transactions on the report from the Transaction Cutoff section.
By Date: Select the Date option and enter a date to report on unpaid invoices with an invoice date on or before the date entered.
By Period: Select the Fiscal Pd/Year option and enter a period to report on unpaid invoices with a Fiscal Pd/Year in or before the specified period. - Select a point at which you want to cut off payments on the report from the Payment Cutoff section.
By Date: Select the Date option and enter a date to include payment information on fully paid invoices with dates between the date entered and the Transaction Cutoff point.
By Period: Select the Fiscal Pd/Year option and enter a period to include payment information on fully paid invoices with periods in or after the specified period and before the Transaction Cutoff point. - Select the date to use as a starting point for aging from the Aging Date field.
- Enter the aging breaks in the Past Due fields.
Note: These are the dates that define aging buckets or categories with a particular aging status. - Select the Secondary tab.
- Enter a range of distribution codes for the view in the Distribution Code section.
Note: Leave these fields blank to include all distribution codes. - Select the Past Due Vendors Only check box, if applicable, to restrict the view to vendors with past-due invoices.
- If you use multicurrency, select the Print All In Base check box to print all transactions (regardless of the currency in which they were entered) in your base, or functional, currency. Clear the check box to select a different currency from the drop-down list.
- Click OK to save any changes made.
Note: Clicking Cancel will exit the Options screen and not save any modified options. Clicking Reset will bring all fields back to their original values. - Click the Refresh Data button to apply the selected options.
