Traverse Standard v11.0
Payment Services
Use the Payment Service Settings function to configure settings for payment services for Traverse desktop, Traverse Point of Sale, or Traverse Portal. Your selected payment service provider allows you to accept credit card or other online payment options. Contact your software provider for assistance, if necessary.
Note: The provider definitions must be loaded into the system database to enable use of this function. Traverse includes a few default providers. Contact your software provider for assistance if you wish to add provider definitions into the system database.
If you are using Point of Sale, and you want to prompt for a signature for non-credit card, or "on-account", orders, see the signature capture information.
To configure a payment service, open the Payment Services function from the System Manager Setup and Maintenance menu.
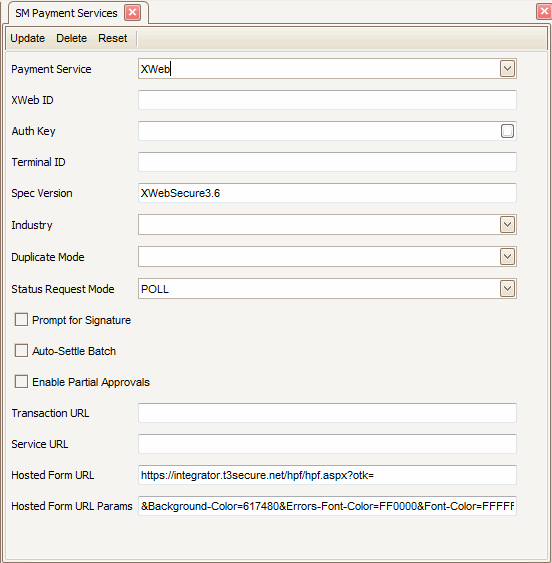
Select a payment provider from the Payment Service field drop-down list. The fields available are dependent on the payment service you select.

- Enter your company's ID as provided by the payment processor into the XWeb ID field.
- Enter the authorization key your payment processor supplied into the Auth Key field.
- As applicable, enter the terminal ID for the current terminal into the Terminal ID field.
- Edit the specification version, if necessary, in the Spec Version field.
- Select your industry from the Industry field drop-down list.
- In the Duplicate Mode field drop-down list, select CHECKING_ON if you would like the provider to detect duplicate transactions, otherwise select CHECKING_OFF.
- The Status Request Mode field setting is determined by the payment provider. Select POLL for a real-time check on the payment approval status. The PERSIST_UNTIL_COMPLETE option is the default mode, which will send a response to the payment provider when an approval, timeout, termination, or transaction complete event occurs.
- If you use Traverse Point of Sale and you want to use signature capture functionality for your payment services, mark the Prompt for Signature check box. When you mark the check box to Prompt for Signature, you must select a Signature Service in the business rules to be able to capture a signature for the payment service.
- If you are set up for auto-settlement with your payment processor, mark the Auto-Settle Batch check box.
- If you are set up for partial payment approvals, mark the Enable Partial Approvals check box.
- Enter the transaction URL for your settlement provider into the Transaction URL field.
- Enter the URL for the payment processing service in the Service URL field.
- The Hosted Form URL and Hosted Form Params should be set as needed for your gateway. Edit these values only if necessary.
- If your payment provider has given you an additional authorization key, repeat the above process for the additional key.
Contact your software provider for assistance, if necessary.

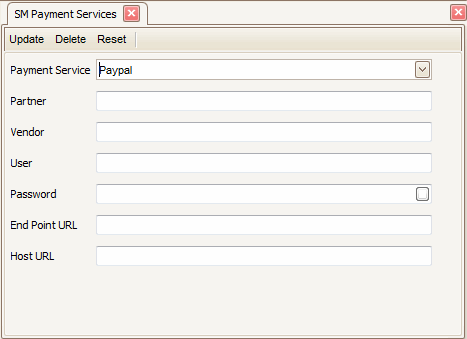
- Enter your partner information as provided by the payment processor into the Partner field.
- Enter the vendor information as provided by your payment processor into the Vendor field.
- Enter your user name and password as required by your payment processor into the User and Password fields.
- Enter the end point web address as provided by your payment processor into the End Point URL field.
- Enter the host web address payment processor into the Host URL field.
Contact your software provider for assistance, if necessary.

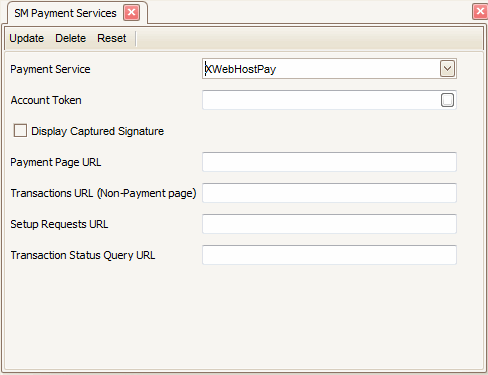
- Enter your company's account token in the Account Token field.
- If you use Traverse Point of Sale and use signature capture functionality for your payment services, mark the Display Captured Signature check box to display the signature captured by the signature pad. When you mark the check box to Display Captured Signature, you must select a Signature Service in the business rules to be able to capture a signature for the payment service.
- Enter the payment page web address for your payment provider into the Payment Page URL field.
- Enter the web address for the non-payment page in the Transactions URL field.
- Enter the web address for setup requests in the Setup Requests URL field.
- Enter the web address for transaction status inquiries in the Transaction Status Query URL field.
Contact your software provider for assistance, if necessary.

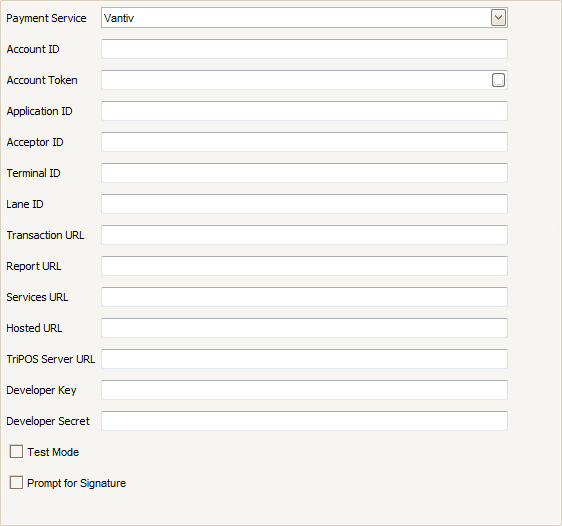
- Enter your company's Account ID as provided by the payment processor into the Account ID field.
- Enter your company's account token in the Account Token field. Click the square button on the right side of the field to show the account token value.
- Enter the application ID in the Application ID field.
- Enter the acceptor ID in the Acceptor ID field.
- If applicable, enter the terminal ID for the current terminal into the Terminal ID field.
- If applicable, enter the lane ID for the current terminal into the Lane ID field.
- Enter the transaction URL for your settlement provider into the Transaction URL field.
- Enter the report URL for your settlement provider into the Report URL field.
- Enter the services URL for the payment processing service in the Services URL field.
- Enter the TriPOS server URL for the payment processing service in the TriPOS Server URL field.
- The Hosted URL should be set as needed for your gateway. Edit these values only if necessary.
- Enter the developer key your payment processor supplied into the Developer Key field.
- Enter the developer secret into the Developer Secret field.
- The Test Mode field setting allows for testing the configuration. Mark the Test Mode check box to test payment processing. Clear the check box to enable payment processing for customers.
- If you use Traverse Point of Sale and you want to use signature capture functionality for your payment services, mark the Prompt for Signature check box. When you mark the check box to Prompt for Signature, you must select a Signature Service in the business rules to be able to capture a signature for the payment service.
Click a command button to:
| Click | To |
| Update | Update the payment service settings with the values you just edited. |
| Delete | Delete the payment service selected. |
| Reset | Set all fields to the most recent values entered. |