Traverse Standard v11.0
Record Production Activity
Once you have exploded and released production orders to production and edited the working bill of material, you can record production activity. This is how you tell the system how much of a raw material or stocked subassembly was used, how much scrap was incurred, labor and machine times, subcontracting information, and so on. You can also use the Record Labor Time function to record specific labor time and the Import Production Activity function to import information from an ASCII file directly into Traverse Production detail tables.
Use the Print button on the toolbar to print the Order Status Report for the current order if the business rule is set to 'Yes'.
- Select an Order Number for which you want to record production activity.
- Use the Expand button on the toolbar to expand the entire tree in the left pane, or click on the plus signs to expand each branch. Use the Collapse button to collapse the tree.
- Select the requirement (assembly, component, or routing) for which you want to record production activity from the Req ID field or from the tree in the left-hand panel.
Remember, you can add columns to the grid view using the Column Chooser.
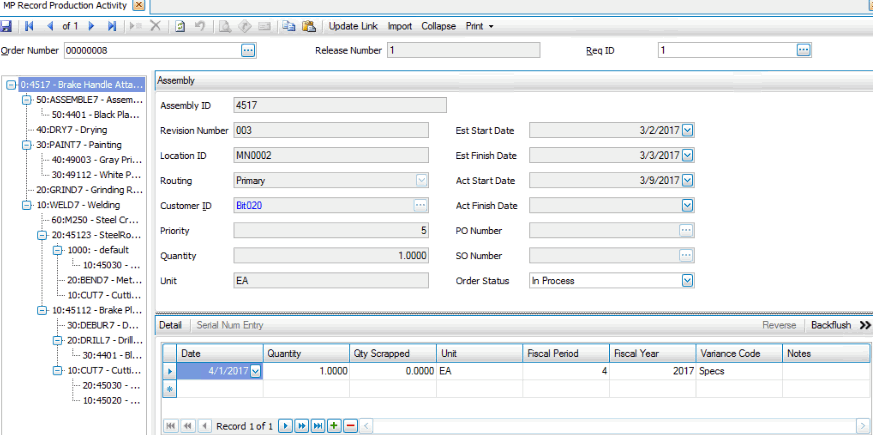
Click the Toggle button ( ) to switch to the field (detail) view of the Record Production Activity section.
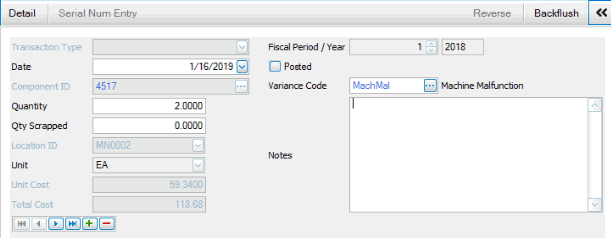
- Select, if applicable, the date for which you want to assign the activity from the Date field.
- Enter the quantity of completed assemblies in the Quantity field. You may enter your quantity information in either the summary mode or detail mode. See the screens above for both views.
- Enter the quantity of assemblies scrapped during production in the Qty Scrapped field.
- Edit, if applicable, the item's default unit of measure from the Unit field.
- Edit, if applicable, the fiscal period and year in the Fiscal Period/Year fields.
- Select, if applicable, a variance code to indicate a specific code describing a problem or note from the Variance Code field. This code is recorded in history, which enables you to select production history data based on this code.
- Enter any applicable notes or comments in the Notes section.
- Click, if applicable, the Detail button to open the Extended Qty screen and add additional information regarding Lot No, Bin, Container, Comment, and Qty Filled.
Note: You can click the Inquiry button to open the WM Item Quantity View function to locate a specific item ID and location. - Click, if available, the Serial Num Entry button to add additional information regarding Serial No and Comment.
- Change, if applicable, the status for the assembly from the Status field.
Note: When you select Completed from this field, the system adds up all of the costs of materials, subcontracting, process, and so on and divides that total by the total completed pieces. This becomes the actual cost of each piece when added to inventory.
If you do not close the order, new assemblies you record go into inventory, but do so at standard cost. This is because the system does not know what additional costs will need to be recorded and has no way of knowing the correct actual cost. If you are using the standard costing method of inventory control, this is not an issue. The update to the manufacturing transaction tables takes place at standard cost and the order release remains open for further recording of production activity. When the order is finally completed, the cost is adjusted, if possible, and cost adjustments to GL are created. - Click the Save button, on the toolbar, to save the recorded production activity.
Record materials used within a production order.
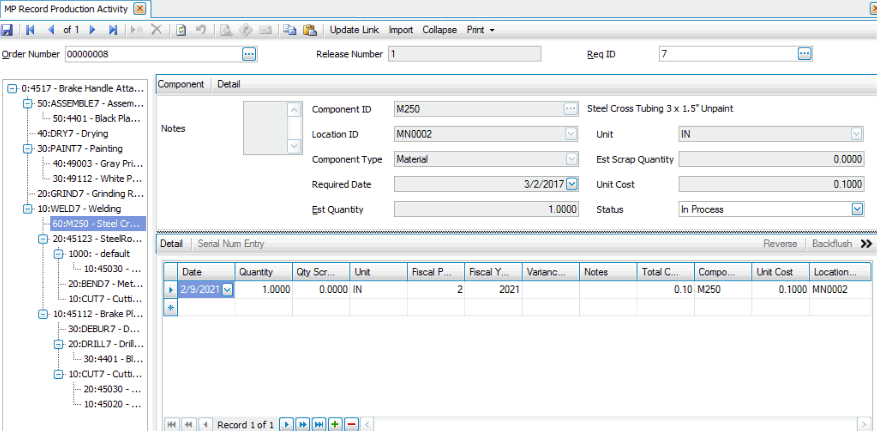
Click the Toggle button ( ) to switch to the field (detail) view of the Record Production Activity section.
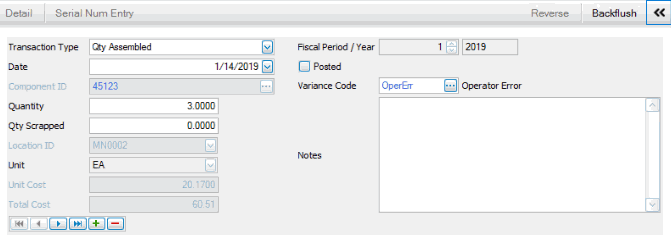
- Select, if applicable, the date for which you want to assign the activity from the Date field.
- Enter the quantity of completed components in the Quantity field. You may enter your quantity information in either the summary mode or detail mode. See the screens above for both views.
- Enter the quantity of components scrapped during production in the Qty Scrapped field.
- Edit, if applicable, the item's default unit of measure from the Unit field.
- Edit, if applicable, the fiscal period and year in the Fiscal Period/Year fields.
- Select, if applicable, a variance code to indicate a specific code describing a problem or note from the Variance Code field. This code is recorded in history, which enables you to select production history data based on this code.
- Enter any applicable notes or comments in the Notes section.
- Click, if applicable, the Detail button to open the Extended Qty screen and add additional information regarding Lot No, Bin, Container, Comment, and Qty Filled.
Note: You can click the Inquiry button to open the WM Item Quantity View function to locate a specific item ID and location. - Click, if available, the Serial Num Entry button to add additional information regarding Serial No and Comment.
- Change, if applicable, the status for the component from the Status field.
Note: If you select Completed, you can not make any additional changes to the component's production activity. - Click the Save button, on the toolbar, to save the recorded production activity.
Record labor and machine time for both setup and run time. You can record the quantity of items that pass through a process as well as the quantity of items that were scrapped as part of the process.
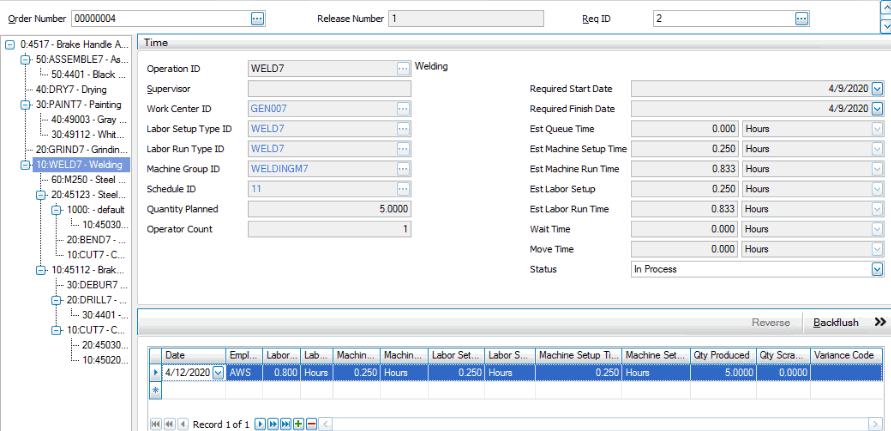
Click the Toggle button ( ) to switch to the field (detail) view of the Record Production Activity section.
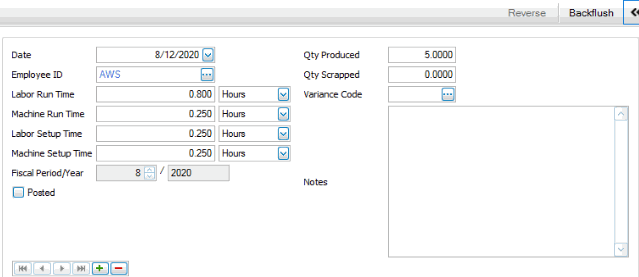
- Select, if applicable, the date for which you want to assign the activity from the Date field.
- Select, if applicable, an employee to associate with working the given amount of time from the Employee ID field. This field is optional. The list of employee IDs will show payroll employees, if interfaced with payroll, otherwise it will show system manager employees.
- Enter the time and associated unit of time it took an employee to run the process in the Labor Run Time field. If the person running the machine is running several other processes at the same time, you may want to allocate only a portion of that person’s time to this process.
- Enter the time and associated unit of time it took for the machine to run the process in the Machine Run Time field.
- Enter the time and associated unit of time it took an employee to set up the process in the Labor Setup Time field.
- Enter the time and associated unit of time it took to setup the machine in the Machine Setup Time field.
- Edit, if applicable, the fiscal period and year in the Period/Year field.
- Enter the quantity produced, in the given amount of time in the Qty Produced field. This number is used to calculate the per piece portion of the labor cost along with the amount you enter in the Qty Scrapped box. The number may also be used by the progress reports and inquiry function as a possible indicator as to how far along a process is.
NOTE: The Qty Produced amount does not affect inventory quantities. It is only used to calculate the per unit cost of labor.
- Enter the quantity scrapped during production, in the given amount of time, in the Qty Scrapped field.
NOTE: The Qty Scrapped amount does not affect inventory quantities. It is only used to calculate the per unit cost of labor.
- Select, if applicable, a variance code to indicate a specific code describing a problem or note from the Variance Code field. This code is recorded in history, which enables you to select production history data based on this code.
- Enter any applicable notes or comments in the Notes field.
- Change, if applicable, the status for the time from the Status field.
Note: If you select Completed, you can not make any additional changes to the time's production activity. - Click the Save button, on the toolbar, to save the recorded production activity.
NOTE: The Machine and Labor Time boxes are optional. Some processes may have labor and no machine time or vice-versa. Entries may be partial, as well, because some companies may record daily progress and others may wait until the process is complete to make an entry.
Record subcontracted component activity that generally takes place offsite and for which the costs are fixed or are beyond your control. Enter the quantity sent, as inventory is sent out, and enter the quantity returned, when inventory returns.
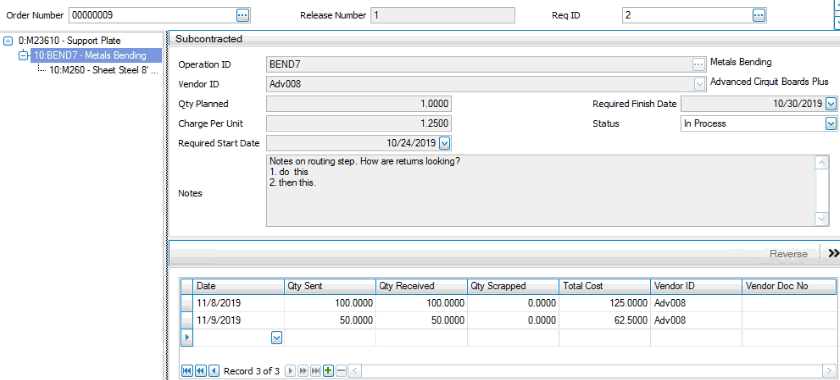
Click the Toggle button ( ) to switch to the field (detail) view of the Record Production Activity section.
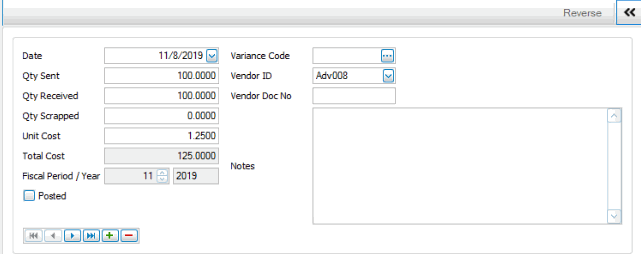
- Select, if applicable, the date for which you want to assign the activity from the Date field.
- Enter the number of units sent out to the subcontractor in the Qty Sent field.
- Enter the number of units received in the Qty Received field.
- Enter the quantity of units scrapped by the subcontractor in the Qty Scrapped field.
- Enter the cost per unit charged by the subcontractor in the Unit Cost field.
- Edit, if applicable, the total cost for the subcontracted component in the Total Cost field.
- Edit, if applicable, the fiscal period and year in the Fiscal Period/Year fields.
- Select, if applicable, a variance code to indicate a specific code describing a problem or not from the Variance Code field. This code is recorded in history, which enables you to select production history data based on this code.
- Select, if applicable, the vendor who provided the services from the Vendor ID field.
- Enter, if applicable, a purchase order number or related document number that pertains to this transaction in the Vendor Doc No field.
- Enter any applicable notes or comments in the Notes section.
- Change, if applicable, the status for the component from the Status field.
Note: If you select Completed, you cannot make any additional changes to the component's production activity. - Click the Save button, on the toolbar, to save the recorded production activity.
By-products, unlike scrap, have value and their quantities are added back into inventory as a potentially resaleable item. The value in terms of cost of byproducts is used to offset the total production cost. The default cost of by-products is the standard cost, unless you override the cost in the Edit Released Orders or the Recording Production Activity functions.
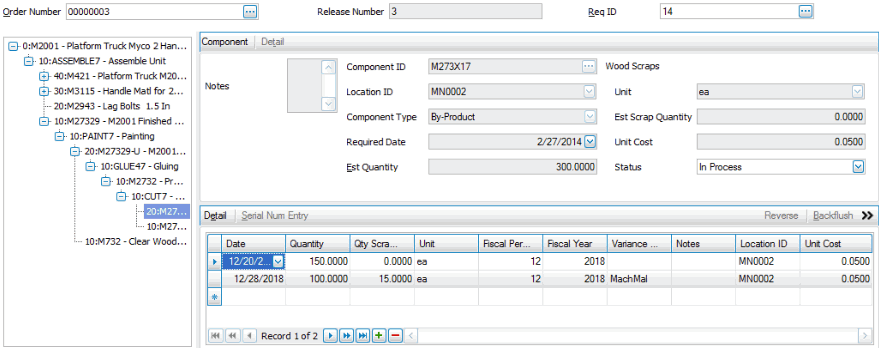
Click the Toggle button ( ) to switch to the field (detail) view of the Record Production Activity section.
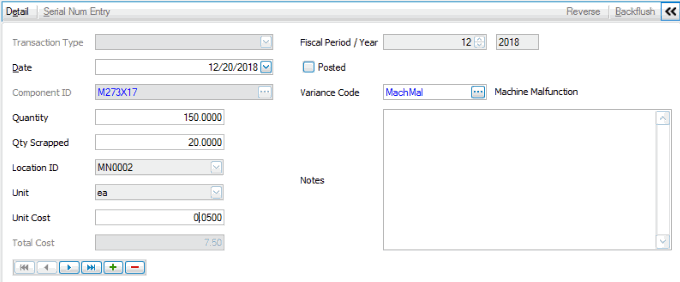
- Select, if applicable, the date for which you want to assign the activity from the Date field.
- Enter the quantity of components produced during production in the Quantity field.
- Enter the quantity of components scrapped during production in the Qty Scrapped field.
- Edit, if applicable, the item's default location from the Location ID field.
- Edit, if applicable, the item's default unit of measure from the Unit field.
- Edit, if applicable, the fiscal period and year in the Fiscal Period/Year fields.
- Select, if applicable, a variance code to indicate a specific code describing a problem or not from the Variance Code field. This code is recorded in history, which enables you to select production history data based on this code.
- Enter any applicable notes or comments in the Notes section.
- Click, if applicable, the Detail button to open the Extended Qty screen and add additional information regarding Lot No, Bin, Container, Comment, and Qty Filled.
Note: You can click the Inquiry button to open the WM Item Quantity View function to locate a specific item ID and location. - Click, if available, the Serial Num Entry button to add additional information regarding Serial No and Comment.
- Change, if applicable, the status for the component from the Status field.
Note: If you select Completed, you can not make any additional changes to the component's production activity. - Click the Save button, on the toolbar, to save the recorded production activity.
Backflushing is used to save the time and work of recording individual requirement activities, and when the production variance from the original working BOM is insignificant or unimportant. If you backflush an entire production order, all of the production order's activity at and below the associated assembly is recorded behind the scenes as being exactly as planned in respect to quantities and time. No further recording of activity is required at this level or below, although other areas may remain unfinished and might be recorded later.
After you do the backflush, if the actual quantities do not match the planned quantities, you can edit the generated activity and change quantities, etc. By making those adjustments when necessary, you will reduce any inventory or cost variances that you may encounter.
Be aware that the backflush process does not generate entries for lotted or serialized items. Those items must be entered manually in order to assign lot and/or serial numbers.
- Click the Backflush button to open the available backflush options.
- Select the check boxes adjacent to the backflush options you want to use.
- Override any existing activity recorded – select the check box so that anything previously recorded is overridden with the originally-planned quantity. If you do not select the box, all current quantities and times are left intact and new requirements for which you haven’t recorded time or quantities are also included.
- Assume estimated scrap quantities – select the box so that as new transactions are written, scrap quantities are created according to the original plan.
- Backflush materials – select the box so that the system looks at materials and by-products when performing the backflush. If you do not select the box, materials and by-products are not affected.
- Backflush routing steps – select the box so that the system looks at internal operations and subcontracted steps when backflushing. If you do not select the box, internal operations and subcontracted steps are not affected.
- Backflush finished assemblies – select the box so that the system looks at the finished Assembly ID when backflushing. If you do not select the box, the finished Assembly ID is not affected.
- Mark order complete – select the box to change the status of the order to Completed; otherwise, clear it to leave the order’s status as it is. This check box is available only if you select the Backflush finished assemblies check box.
- Enter the quantity to use in the Backflush requirement quantity field.
- Select the unit of measure for the quantity.
- Click a command button to
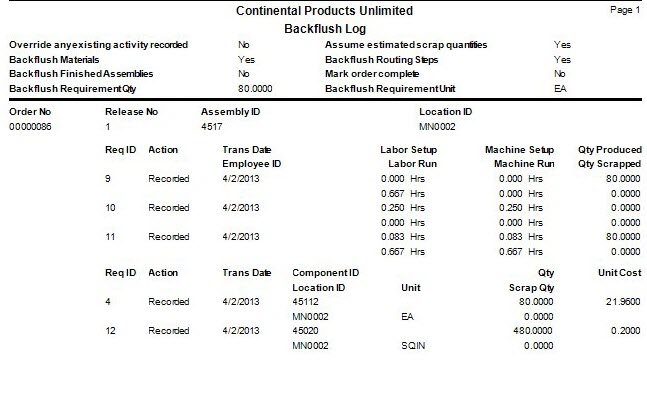
Click To OK Begin the backflushing process. If you receive a dialog box asking if you want to overwrite any existing activity recorded, be aware that activity which has been posted will be skipped. Once posted, entries must be manually reversed. Activity View the Activity Log for backflushing activity. Reset Set all fields to their default values.
Once production activity (Time, Material, or Subcontracted) is posted, you cannot edit it. If you need to make corrections on activity that has been posted, you reverse the original activity record, and then you can edit the production activity. The edited activity will be posted in the current period. Use the Reverse button to reinstate the original activity and reverse the previous activity into the selected fiscal period/year.
NOTES:
- You cannot create a reversing entry in a closed fiscal period.
- You cannot change the fiscal period/year of an existing entry. If you need to change the fiscal period/year, you must either delete/re-enter the activity, or post/reverse the activity.
To reverse production activity:
- Select the posted activity entry you want to reverse.
- Click Reverse to open the Reverse Process window.
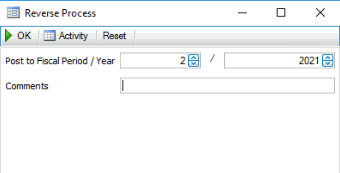
- Accept or enter the fiscal period/year to which the system will post the reversing entry in the Post to Fiscal Period/Year fields. Note the reversing entry uses the fiscal period from these fields and not the fiscal period of the original entry.
- Enter any Comments.
- Use the command buttons
Click To OK Run the reversal process. Activity Display the Activity Log to view posting activity. Reset Set all fields to their default values. - A notification will appear when the reversal process is complete.
- Once the reversal process is complete, you can edit the entry and proceed as usual.
The MP activity reversal will appear in the system audit activity log.
