Traverse Standard v11.0
Inventory Transactions
Use the Inventory Transactions function to enter information for sale, purchase, and adjustment transactions. When you select a tab, unposted transactions appear. Once you enter and save a transaction, you cannot change the Type, Item ID, Location ID, or Unit fields.
If you use Inventory as a stand-alone system, use the Inventory Transactions function on the Transactions menu for the following tasks:
- Adjust quantities.
- Reflect sales when a new order is placed, an order is verified (shipped), a sale is invoiced, or items are returned.
- Reflect purchases when a new order is placed, an order is verified (received), a purchase is invoiced, or items are returned.
- Edit unposted purchase, sale, and adjustment transactions.
If Accounts Payable and Accounts Receivable are interfaced with Inventory, inventory items are updated automatically as purchases and sales are entered. If you have these applications and you do not want corrections to affect Accounts Payable and Accounts Receivable, use the Inventory Transactions function to make corrections. You cannot make adjustments for service items.
| Transaction/Status | Quantity Committed | Quantity in Use | Quantity on Hand | Quantity on Order | Quantity Available |
|---|---|---|---|---|---|
| Adjustment: Increase | Increase | Increase | |||
| Adjustment: Decrease | Decrease | Decrease | |||
| Sale: New Order | Increase | Decrease | |||
| Sale: Verify Order | Decrease | Increase | |||
| Sale: Invoice | Increase | Decrease | |||
| Sale: Post Invoice | Decrease | Decrease | |||
| Sale: Misc. Credit | Decrease | Increase | |||
| Purchase: New Order | Increase | ||||
| Purchase: Goods Received | Increase | Increase | |||
| Purchase: Invoice | Increase | Increase | |||
| Purchase: Misc. Debit | Decrease | Decrease |
Select the Batch Code to put the transactions to and the Sale, Purchase, or Adjustment tab to enter transaction information. When you select a tab, unposted transactions are displayed.
- Once you enter and save a transaction, you cannot change the Type, Item ID, Location ID, and Unit fields.
- The Batch Code is only available if you selected the option to use batching in the Business Rules function.
- The item ID is entered on the transaction line.
Working with Sales Transactions (Sale tab)
Sales transactions update inventory when entered. Use this tab to enter sales transactions if you do not have the Accounts Receivable or Sales Order application.
NOTE: Entering Invoice type sales transactions is recommended. When a 'New' type transaction is entered and posted, the transaction is deleted, then a matching Verify transaction needs to be entered. With the two transaction method there is a good chance transactions can be missed and the committed and on hand and available amounts will not get updated correctly.
- Select the type of sales transaction from the Type field.
Select To New Order A customer places an order invoiced and shipped at a later date. A new order increases the quantity committed and decreases the quantity available. When you post transactions, no entries are made to General Ledger accounts for new orders. You must do a matching verify order when the items have shipped to correctly update your committed and in use fields. Verify Order Record the shipment of items for sales orders. Verify Order status decreases the quantity committed and decreases the quantity on hand. Never do a verify order without a matching new order transaction. If you do not put in a matching new order transaction, quantity committed will be incorrect. Invoice Record the sale of items invoiced and shipped at the same time. An invoice decreases the quantity on hand and available. If you do a new transaction and a verify order transaction, DO NOT do an invoice transaction. An invoice transaction has the same effect on inventory quantities as doing a new order, then a verify order. Misc Credit Record a customer's item return. A miscellaneous credit decreases the quantity in use and increases the quantity available. - Select an item ID from the Item ID field. The item description appears.
- Select a location ID from the Location ID field. The location description appears.
- The item's default unit of measure appears in the Unit field. Accept or select a different unit of measure.
- Enter the quantity of items sold in the sales transaction in the Quantity field.
- The Unit Price of the item is displayed and can be changed. If the transaction is a miscellaneous credit, the unit cost of the item is displayed.
- The Extended Price of the item is displayed. If the transaction is a miscellaneous credit, the unit cost of the item is displayed.
- Click the Save button, on the toolbar, to save the inventory transaction.
Note: When you select a lotted, serialized, or lotted/serialized item, click the Lot/Ser No Entry button when it appears to view or enter lot and serial number information.
- Click the >> button to toggle to the Detail view.
- Select the type of sales transaction from the Type field.
Select To New Order A customer places an order invoiced and shipped at a later date. A new order increases the quantity committed and decreases the quantity available. When you post transactions, no entries are made to General Ledger accounts for new orders. You must do a matching verify order when the items have shipped to correctly update your committed and in use fields. Verify Order Record the shipment of items for sales orders. Verify Order status decreases the quantity committed and decreases the quantity on hand. Never do a verify order without a matching new order transaction. If you do not put in a matching new order transaction, quantity committed will be incorrect. Invoice Record the sale of items invoiced and shipped at the same time. An invoice decreases the quantity on hand and available. If you do a new transaction and a verify order transaction, DO NOT do an invoice transaction. An invoice transaction has the same effect on inventory quantities as doing a new order, then a verify order. Misc Credit Record a customer's item return. A miscellaneous credit decreases the quantity in use and increases the quantity available. - Select an item ID from the Item ID field. The item description appears.
- Select a location ID from the Location ID field. The location description appears.
- Select the general ledger account number from the GL Acct field. If Inventory interfaces with General Ledger, the AR GL Offset account number you selected in the Business Rules function appears.
- Enter the sales transaction date, or use the default workstation date, in the Date field.
- Enter the general ledger period and year of the sales transaction, or use the default workstation period and year, in the Fiscal Period and Year field.
- The item's default unit of measure appears in the Unit field. Accept or edit it.
- Enter the quantity of items in the sales transaction in the Qty field.
- In the Unit Cost field, the costing method (FIFO, LIFO, average, or standard) you are using is displayed if you selected yes to the Show Cost In Transaction Entry option in the Business Rules function. You can change the unit cost if the sales transaction is a miscellaneous credit.
- The Extended Cost of the item is displayed if you selected yes to the Show Cost In Transaction Entry option in the Business Rules function.
- In the Unit Price field, the unit price of the item is displayed and can be changed. If the transaction is a miscellaneous credit, the unit cost of the item is displayed.
- The Extended Price of the item is displayed. If the transaction is a miscellaneous credit, the unit cost of the item is displayed.
- Enter any comments about the sales transaction in the Comments field. These comments are saved in history.
- Click the Save button, on the toolbar, to save the inventory transaction.
When you select a lotted, serialized, or lotted/serialized item, click the Lot/Ser No Entry button when it appears to view or enter lot and serial number information.
- Select the sales type for the serialized item from the Type field.
- Enter the required information in the Item ID, Location ID, Unit, and Qty fields.
Note: The Ser No Entry dialog box appears, if applicable, when you try to go to the next record or when you select Ser No Entry. - Enter/Select the following if you selected
- Click the Save button, on the toolbar, to save the serialized item sale information.
| If You Selected | Then |
|---|---|
| New Order | Do not enter/select a serial number. |
| Verify Order | *Select the serial number. |
| Invoice | *Select the serial number. |
| Misc Credit | **Enter the serial number or select a serial number with a Sold status to return to inventory. |
| * Only serial numbers with an Available status can be sold from inventory. Once you select a serial number, the status changes to In Use and you cannot select it again. The unit cost appears and cannot be changed. The unit price is the base price, but you can change it if necessary. | |
| ** The unit cost appears and can be changed. The unit price is the base price, but you can change it if necessary. | |
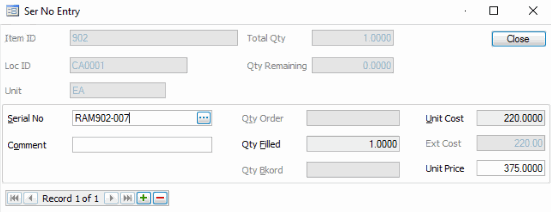
Select the Serial Number. Only serial numbers with available status can be sold from inventory. (When you select a serial number, the status changes to in use and you cannot select it again.) The unit cost is displayed and cannot be changed. The unit price is the base price and can be changed.
- Select the sales type for the lotted item from the Type field.
- Enter the required information in the Item ID, Location ID, Unit, and Qty fields.
Note: The Lot No Entry dialog box appears, if applicable, when you try to go to the next record or when you select Lot No Entry. - Enter/Select the following if you selected
- Click the Save button, on the toolbar, to save the lotted item sale information.
| If You Selected | Then |
|---|---|
| New Order | Select Lot No Entry and enter the lot number. |
| Verify Order | *Enter the lot number. |
| Invoice | *Enter the lot number. |
| Misc Credit | **Enter the lot number. |
| * The unit cost from the costing method you use appears, and you cannot change it. If you select a lot number with a Sold status, the system warns you that the quantity will be negative and the cost (base, average, last, or standard) you selected in the Zero Quantity Sales Costing field in the Business Rules function appears. | |
| ** The unit cost from the costing method you use appears and you cannot change it. | |
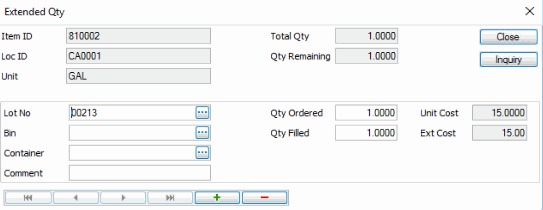
Select the Lot Number. Only lot numbers with available status can be sold from inventory. (When you select a lot number, the status changes to in use and you cannot select it again.) The unit cost is displayed and cannot be changed. The unit price is the base price and can be changed. If you select a lot number with sold status, the system warns you that the quantity will be negative and the cost (base, average, last, or standard) you selected in the Zero Quantity Sales Costing option in the Business Rules function is displayed.
Working with Purchase Transactions (Purchase tab)
Purchase transactions update inventory quantities online and are used to process purchases you make from vendors. Use this tab to enter purchase transactions if you do not have the Accounts Payable application.
NOTE: Entering Invoice type sales transactions is recommended. When a New type transaction is entered and posted, the transaction is deleted, then a matching Goods Received transaction needs to be entered. With the two transaction method there is a good chance transactions can be missed and the on order amounts will not get updated correctly.
- Select the type of purchase transaction from the Type field.
Select To New Order You place an order with vendors to be invoiced and shipped at a later date. A new order increases the quantity on order and does not affect the quantity available. When transactions are posted, no entries are made to general ledger accounts for new orders. If you do a new order transaction you need to do a matching goods received, when the items arrive, this will decrease the quantity on order and increase the quantity on hand. Goods Received Update the quantity and cost of the items you receive from the vendor. Goods received increase the quantity on hand, decrease the quantity on order, and increase the quantity available. Never do a goods received transaction without a matching new order transaction or your quantity on order will not be correct. A goods received transaction decreases the quantity on order and increases the quantity on hand. Invoice Record the purchase of inventory items. An invoice increases the quantity on hand and the quantity available. If you do a new order transaction and goods received transaction DO NOT do an invoice transaction. An invoice transaction has the same effect on inventory quantities as a new order and matching goods received transaction. Misc Debit Record the return of items to a vendor. A miscellaneous debit decreases the quantity on hand and the quantity available. - Select an item ID from the Item ID field. The item description appears.
- Select a location ID from the Location ID field. The location description appears.
- The item's default unit of measure appears in the Unit field.
- Enter the quantity of items in the purchase transaction in the Quantity field.
- The last cost of the item is displayed in the Unit Cost field. Accept or edit the cost.
- The Extended Cost of the item appears.
- Click the Save button, on the toolbar, to save the inventory transaction.
Note: When you select a lotted, serialized, or lotted/serialized item, click the Lot/Ser No Entry button when it appears to view or enter lot and serial number information.
- Click the >> button to toggle to the Detail view.
- Select the type of purchase transaction from the Type field.
Select To New Order You place an order with vendors to be invoiced and shipped at a later date. A new order increases the quantity on order and does not affect the quantity available. When transactions are posted, no entries are made to general ledger accounts for new orders. If you do a new order transaction you need to do a matching goods received, when the items arrive, this will decrease the quantity on order and increase the quantity on hand. Goods Received Update the quantity and cost of the items you receive from the vendor. Goods received increase the quantity on hand, decrease the quantity on order, and increase the quantity available. Never do a goods received transaction without a matching new order transaction or your quantity on order will not be correct. A goods received transaction decreases the quantity on order and increases the quantity on hand. Invoice Record the purchase of inventory items. An invoice increases the quantity on hand and the quantity available. If you do a new order transaction and goods received transaction DO NOT do an invoice transaction. An invoice transaction has the same effect on inventory quantities as a new order and matching goods received transaction. Misc Debit Record the return of items to a vendor. A miscellaneous debit decreases the quantity on hand and the quantity available. - Select an item ID from the Item ID field. The item description appears.
- Select a location ID from the Location ID field. The location description appears.
- Select the general ledger account number from the GL Acct field. If Inventory interfaces with General Ledger, the AP GL Offset account number you selected in the Business Rules function appears.
- Enter the purchase transaction date, or use the default workstation date, in the Date field.
- Enter the general ledger period and year of the purchase transaction, or use the default workstation period and year, in the Fiscal Period and Year fields.
- The item's default unit of measure appears in the Unit field. Accept or edit.
- Enter the quantity of items in the purchase transaction in the Quantity field.
- The last unit cost of the item is displayed in the Unit Cost field. Accept or edit the cost.
- The Extended Cost is displayed.
- Enter any comments about the purchase transaction in the Comments field. These comments are saved in history.
- Click the Save button, on the toolbar, to save the inventory transaction.
Note: When you select a lotted, serialized, or lotted/serialized item, click the Lot/Ser No Entry button when it appears to view or enter lot and serial number information.
- Select the purchase type for the serialized item from the Type field.
- Enter the required information in the Item ID, Location ID, Unit, and Qty fields.
Note: The Ser No Entry dialog box appears, if applicable, when you try to go to the next record or when you select Ser No Entry. - Enter/Select the following:
- Click the Save button, on the toolbar, to save the serialized item purchase information.
| If You Selected | Then |
|---|---|
| New Order | Do not enter/select a serial number. |
| Goods Rcvd | *Enter the serial number to add to inventory. |
| Invoice | *Enter the serial number to add to inventory. |
| Misc Debit | **Enter the serial number to remove from inventory. |
| * The last cost for the item location defaults in the Unit Cost field, but you can change it if necessary. If you need to add more than one serial number and the numbers are sequential, select Auto Gen. | |
| ** The unit cost appears, but you can change it if necessary. | |
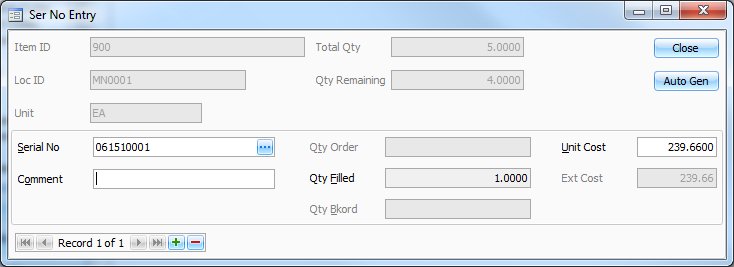
Enter the Serial Number to add to inventory. The last cost for the item location defaults in the Unit Cost field and can be changed. If you need to add more than one serial number and the numbers are sequential, select Auto Gen.
When you click the Auto Gen button, a notification dialog box will appear stating a Starting Serial Number is required. Click OK to close the dialog box. In the Serial Number Entry screen, enter the first serial number you want to appear in the serial number sequence into the Serial No field, then click the Auto Gen button to open the Generate Serial Numbers screen.
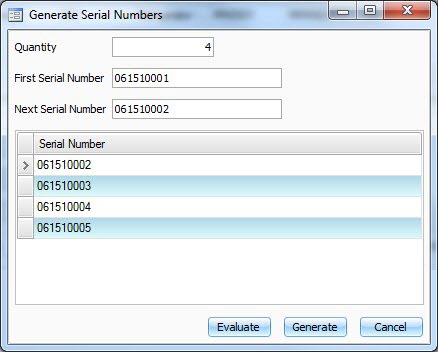
The Serial Number Creation screen appears when you select Auto Gen on the Serial/Lot Number Entry screen and select Simple or By Example in the dialog box, if applicable.
The starting serial number you entered on the Serial/Lot Number Entry screen is displayed in the First Serial Number field.
- In the Quantity text box, use the default quantity, which is the number of serial numbers left to create for the item or enter a different quantity of serial numbers to generate.
- Enter the First Serial Number you want to use.
- The next serial number appears in the Next Serial Number text box. You can generate serial numbers sequentially or in a way specified using the Next Serial Number text box, for example, even numbers only or using letters.
The system ignores separator characters such as hyphens when serial numbers are generated. For example, generate five serial numbers beginning with 1-5 and 1-6. The system generates 1-7, 1-8, 1-9, 2-0, and 2-1. The system reads 1-5 as 15.
The system is also limited by the number of digits. For example, generate five serial numbers beginning with 6. The system displays an out of range message and generates the numbers 7, 8, and 9. The number 10 cannot be generated because the beginning serial number is one digit. To generate all the serial numbers in this example you will need to enter 06 as the first serial number.
-
To generate serial numbers sequentially, leave the serial numbers as they are and click Generate.
- To generate serial numbers in a way other than sequentially, change the Last Serial Number and click Evaluate. Serial numbers based on the first and next serial numbers appear in the box. If they are acceptable, click Generate. If not, continue making changes.
- Once you click Generate the Ser No Entry screen reappears, with the generated serial numbers in the Serial No field.
You are returned to the Serial/Lot Number Entry screen. The generated serial numbers are displayed in the Serial No field.
- Select the purchase type for the lotted item from the Type field.
- Enter the required information in the Item ID, Location ID, Unit, and Qty fields.
Note: The Lot No Entry dialog box appears, if applicable, when you try to go to the next record or when you select Lot No Entry. - Enter/Select the following:
- Click the Save button, on the toolbar, to save the lotted item purchase information.
| If You Selected | Then |
|---|---|
| New Order | Select Lot No Entry and enter the lot number. |
| Goods Rcvd | *Enter the lot number. |
| Invoice | *Enter the lot number. |
| Misc Debit | *Enter the lot number. |
| * The last cost defaults in the Unit Cost field, but you can change it if necessary. | |

The Lot Number Entry screen appears when you enter a new lot number on the Serial/Lot Number Entry screen for a purchase transaction. Use this screen to add information about the lot.
- In the Lot Number field, select an existing lot number, or to create a new lot number, use the Append record button on the navigation bar to open the New Lot Number screen.
- Enter the Expiration Date of the lot if applicable.
- Enter any Comments about the lot. These comments will be saved in history.
Working with Adjustment Transactions (Adjustment tab)
Adjustment transactions update inventory online and are used to correct differences in quantities that do not result from the purchase or sale of an item, such as a decrease in inventory because of damaged items. Adjustment transactions also adjust quantities and costs of transactions from other applications.
You cannot make adjustments to service items.
Entering Adjustment Transaction Information (Summary)
- Select the type of adjustment transaction from the Type field.
- Select an item ID from the Item ID field. The item description appears.
- Select a location ID from the Location ID field. The location description appears.
- Enter the quantity of items in the adjustment transaction in the Adj Qty field. The item's default unit of measure appears in the Unit field.
- Adjust the unit cost in the Unit Cost field, as needed. If you enter an adjustment to increase the quantity of an item, the last cost of the item is displayed and can be changed. If you enter an adjustment to decrease the quantity of an item, the cost from the costing method (FIFO, LIFO, average, or standard) you use appears, but you can change it if necessary.
- The Extended Cost is displayed.
- Click the Save button, on the toolbar, to save the inventory transaction.
Note: When you select a lotted, serialized, or lotted/serialized item, click the Lot/Ser No Entry button when it appears to view or enter lot and serial number information.
| Select | To |
| Increase | Increase both the on-hand and available quantities. |
| Decrease | Decrease both the on-hand and available quantities. |
Entering Adjustment Transaction Information (Detail)
- Click the >> button to toggle to the Detail view.
- Select the type of adjustment transaction from the Type field.
- Select an item ID from the Item ID field. The item description appears.
- Select a location ID from the Location ID field. The location description appears.
- Select the general ledger account number affected by the adjustment from the COGS Adj field. The default GL COGS Adj account is the COGS Adjustments account set up in the account code for this item in the location selected.
Note: If Inventory interfaces with General Ledger and the adjustment is an increase, the AR GL Offset account number you selected in the Business Rules function appears. - Enter the adjustment transaction date, or use the default workstation date, in the Date field.
- Enter the general ledger period and year of the adjustment transaction, or use the default workstation period and year, in the Fiscal Period and Year fields.
- The item's default Unit of measure appears. Accept or edit the unit.
- Enter the quantity of items in the adjustment transaction in the Adj Qty field.
- Adjust the unit cost in the Unit Cost field, as needed. If you enter an adjustment to increase the quantity of an item, the last cost of the item is displayed and can be changed. If you enter an adjustment to decrease the quantity of an item, the cost from the costing method (FIFO, LIFO, average, or standard) you use appears, but you can change it if necessary.
- The Extended Cost is displayed.
- Enter any comments about the adjustment transaction in the Comments field. These comments are saved in history.
- Click the Save button, on the toolbar, to save the inventory transaction.
| Select | To |
| Increase | Increase both the on-hand and available quantities. |
| Decrease | Decrease both the on-hand and available quantities. |
Note: When you select a lotted, serialized, or lotted/serialized item, click the Lot/Ser No Entry button when it appears to view or enter lot and serial number information.
Entering Serialized and/or Lotted Item Transactions
- Select the adjustment type for the serialized item from the Type field.
- Enter the required information in the Item ID, Location ID, Unit, and Adj Qty fields.
Note: The Ser No Entry dialog box appears. - Enter/Select the following if you selected
- Click the Save button, on the toolbar, to save the serialized item adjustment information.
| If You Selected | Then |
|---|---|
| Increase | *Select the serial number with Sold or Lost status to add. |
| Decrease | **Select the serial number with Available status to remove. |
| * The unit cost appears, but you can change it if necessary. If you enter a new serial number, the last code defaults in the Unit Cost field, but you can change it if necessary. | |
| ** The unit cost appears and you cannot change it. | |
- Select the adjustment type for the lotted item from the Type field.
- Enter the required information in the Item ID, Location ID, Unit, and Adj Qty fields.
Note: The Lot No Entry dialog box appears. - Enter/Select the following:
- Click the Save button, on the toolbar, to save the lotted item adjustment information.
| If You Selected | Then |
| Increase | *Select the lot number if the item is in stock or enter a new lot number if item is not in stock. |
| Decrease | **Select the lot number if the item is in stock or enter a new lot number if item is not in stock. |
| * The last cost of the item appears in the Unit Cost field. If the item is not in stock, enter a new lot number and the unit cost. | |
| ** The unit cost appears, but you can change it if necessary. If different costs exist for the lot number, the unit cost from the costing method you use appears, but you can change it if necessary. | |
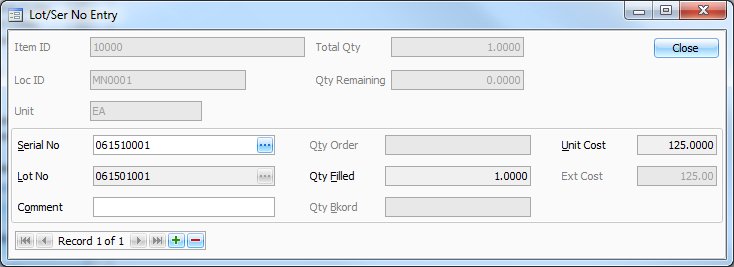
The Serial/Lot Number Entry screen appears when you enter a transaction record for a serialized, lotted, or serialized and lotted item, or when you select Lot No Entry, Ser No Entry, or Lot/Ser No Entry. If you do not enter information on this screen, the transaction line is deleted.
The Quantity field on the Inventory Transactions screen is adjusted if you enter a different quantity of lotted items or a different number of serialized item records on this screen.
Use the delete hot key to remove serial and lot number records, F3, or the delete record button on the navigation bar.
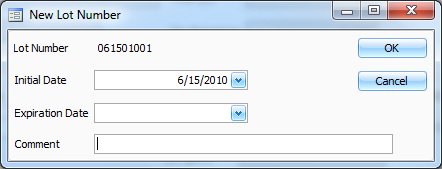
The Append Lot Number screen appears when you enter a new lot number on the Serial/Lot Number Entry screen for a purchase or an adjustment increase transaction. Use this screen to add information about the lot.
- In the Initial Date field, enter the date the lotted item was purchased, or use the workstation date that is displayed.
- Enter the Expiration Date of the lot.
- Enter any Comments about the lot.
- Select OK or Cancel.

The Serial Number Creation screen appears when you select Auto Gen on the Serial/Lot Number Entry screen and select Simple or By Example in the dialog box.
The starting serial number you entered on the Serial/Lot Number Entry screen is displayed in the First Serial Number field.
- The Quantity of serial numbers to generate is displayed, this will default to the quantity of the purchase, received goods, or invoice transaction.
- Enter the First Serial Number you want to use.
- The next serial number appears in the Next Serial Number text box. You can generate serial numbers sequentially or in a way specified using the Next Serial Number text box, for example, even numbers only or using letters.
The system ignores separator characters such as hyphens when serial numbers are generated. For example, generate five serial numbers beginning with 1-5 and 1-6. The system generates 1-7, 1-8, 1-9, 2-0, and 2-1. The system reads 1-5 as 15.
The system is also limited by the number of digits. For example, generate five serial numbers beginning with 6. The system displays an out of range message and generates the numbers 7, 8, and 9. The number 10 cannot be generated because the beginning serial number is one digit. To generate all the serial numbers in this example you will need to enter 06 as the first serial number.
- To generate serial numbers in a way other than sequentially, change the Last Serial Number and click Evaluate. Serial numbers based on the first and next serial numbers appear in the box. If they are acceptable, click Generate. If not, continue making changes.
- Select Generate to generate the displayed serial numbers.
You are returned to the Serial/Lot Number Entry screen. The generated serial numbers are displayed in the Serial No field.
Other actions
- Select a batch code from the Batch Code field.
- Select the transaction line to delete.
- Click the Delete button, on the toolbar, to delete the selected transaction.
- Click Yes at the "Are you sure you want to delete selected record(s)?" prompt.
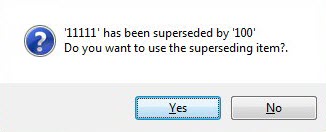
If the item you select has a status of superseded (superseded items are replacements for items that are no longer available for purchase or sale), a message informs you that the item is superseded and asks whether you want to use the superseded item ID. For example, item 700 (plumbing supplies) is no longer available from your vendor. Change the item status to superseded and enter item 701 (another brand of plumbing supplies) in the Superseded Item ID field on the Items screen. If item 700 is entered in a transaction, a message informs you that the item is superseded and asks whether you want to use the superseded item ID. If you select Yes, the system enters item 701 in the field.
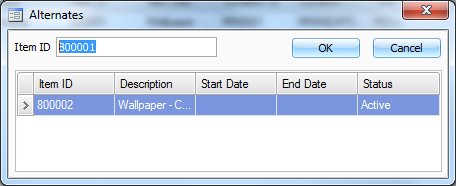
If you enter a new, verify or an invoice order for a sales transaction for an item that has insufficient quantities available, the system asks whether you want to see alternates. If you select 'Yes', the Alternates screen appears when alternate items are available.
- Select the line of the alternate ID to use.
- Select OK.
The alternate item ID is entered on the transaction line.
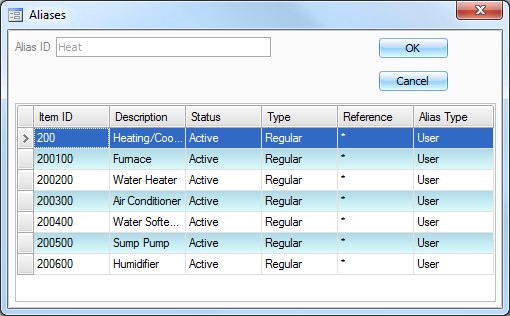
If you entered the same Alias for multiple items, and you have the option to check for Alias on screens selected, the Alias screen appears.
- Select the line of the item ID to use.
- Select OK.